Tuesday, July 23, 2013

Cheddar Bay Biscuits

I can't believe I have not made these yet. I used to LOVE these when we had a Red Lobster near us. I've seen recipes for imitations and just never really glanced them over. That is, until yesterday, when I decided to read one and found out how ridiculously easy it is to make them. I could make them anytime I wanted, considering that it's all pantry staples other than the buttermilk and some shredded cheddar (which is usually something I always have on hand anyways). Now, I know it's 3:40 in the afternoon, but I figured I could make them ahead for dinner (steak tips, carrots and rice)...(something Dan would eat every day of the year if he could).


I see commercials for Red Lobster all of the time, and really have no idea where the closest one is since the one near us in New Hampshire closed many moons ago. Every time I see a commercial I think of these biscuits. I don't remember exactly what they taste like, but they were heaven, and these are pretty bleeping good too. Yes, that's right, before I sealed them up to save them for dinner I tried one. What kind of food blogger/novice chef would I be if I didn't sample my wares???

Now I just have to try not to sample another one. You know, just to see if the second's as good as the first...

Cheddar Bay Biscuits
from Wishes N Dishes

Biscuits:
2 cups all-purpose flour
2 tsp baking powder
1/2 tsp baking soda
1 tsp sugar
3/4 tsp salt
1/2 tsp garlic powder
1/4 tsp cayenne pepper (I used slightly less than this)
About 1 cup shredded cheddar cheese, I used a cheddar blend
1/2 cup melted unsalted  butter, cooled for 5 minutes
1 cup cold buttermilk

Topping:
2 tbsp unsalted butter, melted
1/2 tsp garlic powder
1/4 tsp dried parsley (or 1 tsp fresh)

1. Preheat oven to 475.
2. Line a baking sheet with parchment paper.
3. In a medium mixing bowl, whisk together the flour, baking powder, baking soda, sugar, salt, garlic powder and cayenne pepper. Mix in the cheddar.
4. In a small bowl, mix together the buttermilk and melted butter until small clumps form.
5. Add the buttermilk mixture to the dry ingredients and mix with a rubber spatula until a soft sticky dough forms and there are no dry ingredients remaining.
6. Use a greased 1/4 cup measuring cup to spoon dough onto the prepared baking sheet. Bake for 12 minutes.
7. As they are baking, mix together the topping ingredients. When biscuits come out of the oven, immediately brush them with the butter mix. Let sit for 5 minutes before serving.

**Can be stored for a few days in an air-tight container at room temperature. Makes 12 biscuits.


*** Note: Though they looked burnt, the bottoms didn't burn. That's from me moving the dough around before baking, leaving some residue that burnt.

Sunday, July 14, 2013

Bacon Ranch Potatoes

For special occasions I get asked to make my cheesy potatoes. I found a recipe that is similar to them, but with a bit more kick of flavor. My cousin Billy is home for a few weeks from being stationed in Hawaii, so my family is having a BBQ for him today. I was asked, of course, to bring the potatoes. I'm hoping everyone likes them just as much or more than the regular cheesy kind.

Bacon Ranch Potatoes
from Plain Chicken

1 pkg. frozen hashbrown shredded potatoes
2 containers sour cream
2 cups shredded cheddar cheese
2 packets of ranch dip mix
2 (3 oz) packages of real bacon bits

1. Preheat oven to 400.
2. Mix all ingredients together until well combined.
3. Spread into a 9x13 baking dish.
4. Bake for 50-60 minutes.

And that's that.


Thursday, July 11, 2013

Mixed Berry Muffins

I really wish I was good at/knew anything about gardening. Aside from lots of beautiful flowers and bushes growing throughout my yard, I have my blueberry and blackberry bushes as well. Thankfully, they are low maintenance and just require me to pick the berries when they're ready...a job I share with a local black bear that also enjoys to eat our berries. He more-so tears down the branches and eats them, rather than my method of delicately picking them and letting out some choice curse words when the thorns attack my fingers.


That picture was taken a couple weeks ago, before any berries were ready and before I found out about our bear friend. I have a good 4 or 5 bushes in the back corner of the yard.

Each day, in the not-so-welcome humidity, Tess and I run around the yard and I take my bowls out to collect more berries.

After 3 double handfuls used in today's muffins...

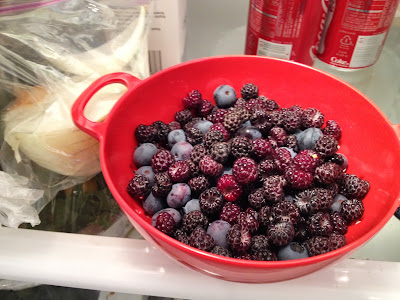
Today's picking in the fridge...
I'm sort of kicking myself since summer school started this week and I mentioned that I would bring in some berries or items with berries in them for the kids. I chose today to bake...and we don't have school on Fridays...oh well, next week.

This recipe was really easy to make, and one where I will always have the ingredients for, so long as I have fresh milk and eggs. It's very basic, not too sweet, which I prefer. Some of the berries were very sweet, while others were a little tart, so there was a few flavors in each muffin. If you like a sweeter muffin, you could add a streusel topping. The muffins were very light and fluffy.

Mixed Berry Muffins
from Food.com

 4 cups all-purpose flour
1.5 cups sugar
5 teaspoons baking powder
1/2 teaspoon baking soda
1/2 teaspoon salt
2 cups milk
1 cup vegetable oil
4 large eggs
2 and 2/3 cups fresh berries(blueberries, blackberries, raspberries, chopped strawberries, your choice!)

1. Preheat oven to 400 and line 24 muffin cups.
2. In a medium bowl whisk together the flour, sugar, baking powder, baking soda and salt.
3. In another medium bowl, whisk together the milk, oil, and eggs.
4. Make a well in the dry ingredients and pour the wet ingredients into the well. Mix until just combined.
5. Fold in the berries (I did 3 double handfuls).
6. Fill muffin cups about 3/4 full and bake for 15-20 minutes or until a toothpick comes out clean.
7. Let cool for 5 minutes then move to a rack to cool completely.


Friday, July 5, 2013

S'More Bites

Where to begin...

It's been quite a while since I've posted, but all for good reasons. The most important reason is that Dan and I are finally moved into the house! We have basically been painting and fixing everything up and then moving in for the past 2 months. We still have a few more boxes to unpack, but we're almost there!

The other big news is that we're engaged! Dan proposed our first night in the house.

It has also been a solid 90+ degrees out for the past 2 weeks, and for our first few days, our AC was broken. There was no way I was turning the oven on. With the Fourth of July coming, and the AC fixed, I figured we could get back to cooking. Dan made his famous and much-demanded buffalo crescent rolls and I made s'more bites. Granted, making spicy food and things with chocolate when it's 95 degrees out isn't the best idea, but we went for it.

S'More Bites
from Sweet Pea's Kitchen

7 whole graham crackers, finely crushed
1/4 cup powdered sugar
6 tablespoons unsalted butter, melted
4 bars milk chocolate candy, divided
12 large marshmallows

1.Preheat oven to 350°F.
2.Place graham crackers into a large resealable plastic bag. Finely crush into crumbs.
3. Combine graham cracker crumbs, powdered sugar and butter into a small bowl. Evenly divide crumb mixture into each cup of a 24 cup mini muffin pan. Press crumbs to form shallow cups. Bake 4-5 minutes or until edges are bubbling.
4. Meanwhile, break two of the candy bars into rectangles. Remove pan from oven; place one rectangle into each cup.
5. Cut marshmallows in half crosswise using scissors dipped in cold water. Place one marshmallow half, cut-side down, into each cup. Return to oven 1-2 minutes or until marshmallows are just slightly softened. Cool on a cooling rack for 15 minutes before carefully removing cups from pan. Cool completely on wire rack.
6. Break remaining candy bars in small pieces and place in a small bowl. Microwave on high 1 minute-1 1/2 minutes or until melted and smooth, stirring every 20 seconds. Drizzle over the marshmallows.