Sunday, December 29, 2013

Mini Pumpkin Chocolate Chip Bundt Cakes

Are these actually mini bundt cakes or just mini fluted cakes? Bundt cakes have a traditional shape, and they make mini bundt pans, but they also make mini fluted cake pans, which I got two of for Christmas (awesome!), so which ones are these exactly? After answering that question, and ignoring that really long run-on sentence, we can move on to what's important - the food!

Now that all Christmas celebrations are over, I can finally share my goodies. Here are some things I received:

Large storage bins for the basement (desperately needed)
Lots of awesome stocking stuffers (nail polish, socks, earrings, etc)
Three awesome cardigans
A sweet Bruins long sleeve shirt
Winter hat and North Face Gloves
Driving gloves with the touch screen sensor in them so I can use my phone while wearing them
2 mini fluted cake pans (featured below!)
Cupcake boxes and liners
A cupcake frosting tip set
A giant frosting tip that I've been waiting for
A Santa decoration display
A three-tired cupcake display stand
A recipe journal
A cupcake batter dispenser
Homemade hand warmers
Gift cards to TJ-Maxx, Home Depot and Petco
A 3-crock slow cooker (score!)
A 3-tired cooling rack (also featured below)
A nice fleece zip-up
And these two gems that I've had on my wish list since last Christmas

Whipped cream dispenser!!

Kitchen torch!!!
There are other things I got that I forgot to list, not because they aren't important, but I was just very blessed and fortunate and got so many great things this year! So what is the first thing made with some of my new Christmas kitchen gear?


Yeah, I got right to it with my mini fluted cake pans and three-tiered cooling rack. I saw this recipe a few weeks ago when browsing Pinterest (where else?) and it prompted me to add the mini fluted cake pans to my Amazon wish list. I ended up with two of them, which I couldn't be happier about!

This recipe was super easy. The website I got it from (follow the link below), adapted it from a pumpkin bread recipe. I'd love to try the bread recipe as well, these were soooooo good. Not overly sweet, but hit the spot when you're looking for a fresh baked goodie to snack on on a cold rainy night like tonight. The recipe didn't say how much to fill the cake molds, so I did 3/4 full, which puffed up a little bit more than I wanted. Next time, I'll fill them half full. If you like bundt cakes, check out the Food Librarian website. She did 30 days of bundt cakes....I wish I could make something for 30 days straight, but I like to switch it up too much.

Mini Pumpkin Chocolate Chip Bundt Cakes
from The Food Librarian

1 and 3/4 cups all-purpose flour
1 tbsp. pumpkin pie spice (or 1/2 tbsp. each of cinnamon and nutmeg)
1 tsp. baking soda
3/4 tsp. salt
1 and 1/2 cups sugar
1/2 can of pumpkin puree
1/2 cup canola oil
2 eggs
1/2 tsp. vanilla
1/3 cup water
1/2 cup chocolate chips

powdered sugar for sprinkling (optional)

1. Preheat oven to 350 and spray 2 mini bundt or fluted cake pans with cooking spray.
2. In a medium mixing bowl, whisk together the flour, spices, baking soda and salt.
3. In a separate medium mixing bowl, combine the sugar, pumpkin, oil, eggs, vanilla and water. Mix until smooth.
4. Blend in the flour mix and mix until combined.
5. Fold in chocolate chips.
6. Fill each cake mold half full and bake for 20 minutes or until a tooth pick comes out clean.
7. Let cool and sprinkle with some powdered sugar.


Saturday, December 28, 2013

Revised Cheesy Potatoes

This is a re-post of sorts. Over a year ago, I found a recipe for some cheesy potatoes that I made for a family party. They ended up being such a big hit, that I have to make them for every family party. I have now introduced them to Dan's family as well. Since the first time, I have changed them slightly. Yesterday we celebrated Christmas with Dan's family, and his sister requested I make some, and since they're so easy to make, I was happy to do so. The original recipe was shredded hash brown potatoes, sour cream, cream of potato soup, Parmesan cheese and shredded cheddar cheese. I have since added in some ranch dip mix to the ingredients. Then, yesterday, I decided to change it up even more. One change was on purpose, the other was not. The first was adding a can of cheddar soup in place of one of the cans of cream of potato. It added more cheesiness and made the potatoes creamier, which I thought was much better. The second, the unplanned change, was that the store was out of hash brown potatoes. I finally found a different brand (I think a more healthy brand?), either way it was much more expensive, but I needed it so I grabbed it. When I got home, I realized that these potatoes were seasoned with garlic and onion flavoring. That added even more flavor, and from now on, I will choose those potatoes over the regular plain ones I buy. So, here's what the recipe is now

1 (30 oz) bag hash brown shredded potatoes
1 (16 oz) container sour cream
1 can cream of potato soup
1 can cheddar cheese soup
1 packet ranch dip mix
1/2 cup grated Parmesan
1 cup shredded cheddar cheese

1. Preheat oven to 350. Mix all ingredients together and bake in a 9x13 pan for 1 hour and 30 minutes, covered. Uncover and bake for an extra 10-15 to get it nice and bubbly and browned.

Friday, December 27, 2013

Crescent Deli Roll-Ups

We are about to embark on our final Christmas celebration with Dan's immediate family. We've already been through Christmas with ourselves (and the pups!), my immediate family, my extended family and Dan's extended family. It's time to wrap up the holiday week with his family. I can't complain though, it's been a good week with lots of family gatherings! Oh, and good food too!

This recipe was something I made for my family on Christmas Eve, but did it a little differently. It stemmed from the idea of a Monte Cristo sandwich. Somewhere I saw a recipe for Monte Cristo roll-ups made with puff pastry. To make it a bit more simple, I thought I would do something similar with crescent rolls. I can't call this a Monte Cristo roll-up though, because I'm leaving out the powdered sugar, maple syrup, jam, egg, etc. So, I'll call these deli roll-ups because you could change them out with any deli meats and cheeses you want. I chose to use what you'd find in variation in a Monte Cristo - ham, turkey, provolone cheese and honey mustard. The first time I made these, I made them rolled up like a pinwheel, this time I just rolled them up like a regular crescent roll. Both ways are delicious!

Crescent Deli Roll-Ups

2 cans crescent rolls
1 jar honey mustard (you won't use all of it)
8 slices ham, cut in half (I used honey ham)
8 slices turkey cut in half (I used maple-honey turkey)
8 slices provolone cheese, cut in half

1. Preheat oven to 375. On each crescent triangle, spread a little honey mustard. Place a slice of ham, then a slice of cheese, and then a slice of turkey. Roll up like a crescent and place on a cookie sheet. Repeat with all crescent pieces.

2. Bake for 16-17 minutes until crescents are cooked!


I also made my cheesy potatoes, but revised to recipe a bit, so I'll post that another time!

Wednesday, December 25, 2013

Raspberry Hot Chocolate Cupcakes

So, let's start with a positive and say Merry Christmas to everyone! I am currently at my parents' house, and 4 out of the 5 people here are using some piece of technology. That's kind of sad, but I have a little time to kill. Everyone else is setting up new gifts. Dan got a work radio where you can hook up an MP3 player and charge a whole bunch of batteries. My brother is setting up my mom's new Chromebook, and my mom is sending pictures of my brother and my dog Tess to his girlfriend. All while my dad watches some Animal Planet show about sea creatures. This is Christmas at my parents'. Next up is Christmas at my Gram's. Another round of family madness and lots of food. Then, its off to Dan's aunt's for round 3. That's where the cupcakes come in.

These didn't come out as planned. I already know how I would change it if I make them again. They're still really good and everything, just not what I wanted them to be. I think next time, I'll skip using fresh raspberries and stick with an extract or use raspberry gelatin in the marshmallow filling. The marshmallow filling I ended up with was pretty runny, and ended up soaking into the cake which then just soaked to the bottom, so the bottoms of these are basically soaked in raspberry juice. Then, they're topped with a fresh raspberry whipped cream, which is really good. I think next time I would make a more traditional marshmallow cream with marshmallow and butter. Or, I would do a chocolate raspberry ganache with a raspberry marshmallow flavored whipped cream topping. Why don't I think of these things before hand? Below and the original recipe. The difference I did was that I didn't strain the raspberries, just mashed and mixed them in, which may have accounted for the runny texture. The only change I made was that I added some raspberry extract to my frosting.

Raspberry Hot Chocolate Whipped Cream
Adapted from Your Cup of Cake

1 box Devil's Food cake
3 eggs
1/2 cup oil
3/4 cup buttermilk
1/2 tsp cinnamon
1 tsp vanilla
1 cup sour cream

1. Preheat oven to 350. Line 2 muffin pans with liners.Combine eggs through sour cream in the bowl of a stand mixer using the stir setting. Mix until combined. Add the cake mix, and sift it if you want to get rid of the lumps. Stir until combined. Fill liners 3/4 full and bake for 17-22 minutes. Remove from oven and let cool.

1 jar marshmallow cream
1 pint raspberry mashed and strained
1 cup powdered sugar

2. Combine everything in the bowl of a stand mixer and mix until combined. Cut out a piece of cupcake from the center of each cake and fill with marshmallow cream.

1 pint whipping cream
1 cup powdered sugar
2-3 tsp. raspberry gelatin
If you have it, 1/4 tsp raspberry extract

3. In the bowl of a stand mixer with the whisk attached, whip the cream until stiff peaks form. Add the powdered sugar and gelatin and mix slowly until everything is combined. Add the extract if using and give another quick mix. Frost cupcakes as desired.

I decorated mine with chocolate sprinkles and mini marshmallows.


Tuesday, December 24, 2013

Apple Kielbasa

MERRY CHRISTMAS EVE!

I love the holidays, but even the thought of the holidays stresses me. I never get my shopping done early, my recipe plans change every day the two weeks leading up to Christmas, and just the whirlwind that is Christmas Eve and Christmas Day. This year we are especially busy. Last night, we had my future mother in-law's birthday dinner, then today is Christmas Eve, which consisted of prepping my recipes (2 of which already have not come out to plan...), and making sure all gifts are bought and wrapped. Tomorrow is Christmas Day, which sees Dan and I waking up here and exchanging presents with the pups (they got more than we did), prepping food, heading to my parents' for gifts there, then to my grandmother's for lunch and gifts and then to Dan's aunt's for more gifts and more food. Then Thursday is the service for his grandfather, and then Friday we celebrate Christmas with Dan's immediate family. And then it's a few days off and then New Years Eve. See, I'm stressing just thinking about it.

Here's one recipe that did turn out alright. For Christmas Eve at my Gram's we have a smorgasbord of foods to pick at. I figured I'd bring a couple things to munch on. One being Monte Cristo bites (did not work as planned but still okay), and two being this kielbasa. I wanted something easy while I baked and finished wrapping. This came out really good. I couldn't find the Dijon mustard in the fridge, finally saw it about 20 minutes ago! I used some honey mustard instead. I was a little worried that this would come out really sweet, but the kielbasa balances it right out. A perfect party snack! And it really is this easy. Don't mind the liners, though not incredibly attractive, it saves from some serious dish washing in the end. Plus, if anyone comments on the unattractiveness of the liner, slap their hand away from your food. You and your kielbasa don't need their judgment!

Kielbasa

And brown sugar

And some apple sauce

And honey mustard and garlic

Cooked on low for 6 hours!


Apple Kielbasa
adapted from Busy Cooks

3 kielbasa links, sliced
1 (24 oz) jar chunky apple sauce (I used about 3/4 of it)
1 cup brown sugar
2 tbsp. honey mustard
about 4 cloves garlic, minced (I used 2 big spoonfuls of jarred minced garlic)

Place everything in the crock pot and cook on low for about 6 hours!

Sunday, December 22, 2013

Bacon, Spinach and Ranch Roll-Ups

Last night was my second Yankee Swap of the year, one more to go. For the first time ever, I got #1! Seeing as it is the holidays and the time of giving, I used my #1 status to get back something Dan had wanted from the swap. Fiance brownie points for me!

There's always really good foods at swaps, which makes pulling a bad number not so bad. Last night I got the best of both. Dan and I ran around all day finishing (ok, maybe starting) a bunch of our Christmas shopping. I needed something quick to make because we didn't have much time. I decided on our tried and true buffalo chicken crescents and these tortilla roll-ups. Both are super easy to make and everyone loved them!

Bacon, Spinach and Ranch Roll-Ups
slightly adapted from Mom Spark

1 pkg. large flour tortillas
2 pkg. cream cheese, softened
2 large handfuls of baby spinach, chopped
1 package bacon bits
1 pkg. ranch dip mix

1. Mix together all of the ingredients and spread evenly onto tortillas. Roll tortillas up, chill in the fridge for a bit, and then cut into bite-sized pieces.

DONE!

They were a huge hit, I got a lot of compliments of them, and they only took me about 15 minutes!

I don't have a picture, though. Time being short made me forget to snap a photo of them. Go to the original link to see what they look like.

Wednesday, December 18, 2013

Chicken Cordon Bleu Lasagna

We LOVE our chicken cordon bleu in this house. We like it traditional style, Dan's "throw it together style" (the best!), casserole style, and now lasagna style. Yesterday, I was searching for recipes to use in my classroom, and this was on the board I was searching on Pinterest. Who would ever have kids make this is beyond me, but I knew it was something I could do in my own kitchen. So, I made it.

Today was yet another crazy day at work. It always is when the holidays are a week away. The ever-present anxiety and excitement from the kids, the taunting "you're not done your Christmas shopping" voices in my head. It was nice to come home and have Dan home all afternoon and night as well. Even though Dan was beat, he still did a couple of jobs around the house. You see, our house was built in 1958, and we still have the windows from 1958. The single-paned, "we're gonna let all the heat out of your house", original windows. Last month, Dan heat sealed our windows and the one right behind me, where I sit here on our couch, opened up. It's not too fun to randomly feel an ice cold breeze on the back of my neck, but it's also not too fun (or at all fun) to pay for oil, so I'll take the not so aesthetically pleasing plastic heat-sealed windows over going broke.

But let's get back to this lasagna, because that is why you're all reading this after all. I've never met a lasagna I didn't like. Red sauce, white sauce, meat veggie, whatever's in it, it's all good. Now, with the fabulous oven ready noodles, lasagna making is even easier. Well, except that once those noodles touch anything the instantly start to curl, so don't open the package until you are ready to assemble the lasagna. What's not to love about this lasagna? It's chicken cordon bleu, which is awesome, but then you add pasta, and heavenly cheesy goodness to it. I will admit, when I saw that this recipe had cottage cheese in it, I wasn't too gung-ho about it. I was just going to go with all ricotta, but I figured I might as well try it. I think the cottage cheese added a nice little tang to the cheese, which was good because with the other cheeses and the ham, the salt needed a little something to balance it out. If you're going to make a lasagna for the holidays, go with this one. It's a bit unique, but still a traditional favorite, which is sure to please almost everyone at any gathering. If they don't like lasagna or chicken cordon bleu...well, stop inviting them to your gatherings.

Chicken Cordon Bleu Lasagna
from Life in the Lofthouse

1 package oven ready lasagna noodles (I used half)
2 cups diced, cooked chicken
2 cups diced, cooked ham
1 jar garlic Alfredo sauce (plus 1/2 cup for spreading in the dish, so 2 jars)
1/2 tsp garlic powder
2 eggs
1 (15 oz) container ricotta cheese
1 cup cottage cheese
1/2 cup grated Parmesan cheese
1 tsp dried parsley
2 cups shredded mozzarella cheese
1 cup shredded Swiss cheese

1. Preheat oven to 350 degrees. Pour the 1/2 cup Alfredo sauce onto the bottom of a 9x13 baking dish and spread around.
2. In a large bowl, mix together the chicken, ham, jar of Alfredo and garlic powder. In another large bowl, mix together the eggs, ricotta, cottage cheese, Parmesan cheese and parsley.
3. Lay 3 lasagna noodles in the pan. Top with half of the cheese mixture, spread to cover noodles, and then top with half of the chicken mixture. Repeat with another layer of noodles, cheese mix and chicken. Sprinkle mozzarella and Swiss on top.
4. Cover and bake for 1 hour.


Tuesday, December 17, 2013

Garlic Parmesan Shrimp

The week before the holidays never goes smoothly. Let's look at today, for example. Half day for students, which was great, professional development for me, not so great. Then, the snow starts falling. I head out of work, tackle the grocery store, and realize I left my phone on my desk. Back to the school I go, behind cars that were driving a little too slow for the small amount of snow that we had so far. As I get out of my car at the school, half of the heel to my boot detaches from the sole...awesome. I get home, relax for a bit, then decide to get to it for dinner. I bought some peel and eat shrimp because they were on sale (I always buy already peeled shrimp). Yeah, never again will I buy them, sale or no sale. It took me forever to peel them! Then, Lana decided to jump up to the kitchen counter, steal the paper towels and shred them all over the living room. She also ran and jumped up onto the counter, as in hind legs were up there and promptly fell back to the floor. Every low was placed up high on the counters so she can't get to them. Guess we'll have to start taping stuff to the ceiling...

The real downside to today (aside from those smaller annoyances) was that Dan's grandfather passed away. While death can sometimes be a blessing, it still sucks. Dan and I decided to go over to his Nana's. This dinner (though fully made) was put on hold for some late-night eating. We did get to enjoy some of Dan's aunt's delicious meatloaf though. I am not one for meatloaf, ever, but this one was really good. It was thick as a brick, it was tender and the barbecue sauce was a great addition!

We have just returned (I started this post 5 hours ago) and I shoveled off the walkways and stairs. Dan is finishing up the last of the snow blowing. I think I will try a little of my shrimp (so I can actually give it a review) and then it's off to bed.

These shrimp were great! I'm not sure if it's due to the fact that they sat in butter for a while (since we didn't eat them right away), or if it's because I bought frozen raw shrimp instead of cooked (my usual freezer staple), but they were super moist and plump. You know when you bite into a shrimp and it's juicy and sort of "pops"? All the butter and garlic and Parmesan flavor really came through. I had mine over some jasmine rice with some steamed veggies, but they would be great over pasta as well.

Garlic Parmesan Shrimp
slightly adapted from Homerun Meals

24 or so large shrimp, peeled and deveined
1/4 cup olive oil
3 cloves garlic, minced
tsp dried parsley
sprinkle of red pepper flakes
1/2 cup butter, melted
1/2 cup fresh Parmesan cheese, grated
1/2 cup breadcrumbs mixed with 2 tbsp. Italian seasoning or Italian breadcrumbs

1. Preheat oven to 300.
2. In a large Ziploc bag, combine the shrimp, oil, garlic, parsley and red pepper. Close and shake to coat shrimp. Pour shrimp into an 11x7 pan and spread out evenly.
3. Cover and bake for 15 minutes. Turn shrimp over and drizzle on butter. Cover with breadcrumbs and cheese and bake, uncovered for another 10 minutes.
4. Serve how you please!


Saturday, December 14, 2013

Chocolate Pumpkin Spice Cupcakes

Every year, some friends of mine host a ladies' Yankee swap at the local VFW. This year, we had over 50 women I believe. This year was also the first year I had a decent swap gift in front of me for quite some time. I was number 10, which is the usual for me, a very low number. Somehow, I ended up with a bottle of Grey Goose in front of me until the third to last person, who finally took it. My final gift was a $20 gift certificate to a local Italian restaurant, which is fine, but I wanted the booze. Oh well, there's always next year...

One of the most enjoyable things about the swap is the food. Nothing like a good pot luck lunch to gear you up for a snow storm! I usually bring an appetizer to the swap, but this year I brought cupcakes. I haven't made cupcakes from scratch in a while, my last few batches have been doctored boxed mixes. So these were a bit more time consuming than the last few.

Whenever I make chocolate cupcake, I'm always very skeptical about the recipes. I've had a few recipes that always fail (from different blogs, but they end up very similar, and then when I go back and check, it's the same recipe I've tried in the past and failed as well). I did my research and made sure I had never used this recipe to be sure it wasn't a failure one. I don't think I could handle a kitchen failure this morning.

Side (but related) story. This week has not been the best kitchen week for me. I attempted to make some very simple jam kolaches, and they all (but one!) opened up in the oven, which ruined them. Well ruined the presentation at least, not the taste. Then, we were cooking in my class yesterday, so I get my kids all set up to make apple cider crisp. Not only did the prep work take longer than planned, so they couldn't eat their crisp before dismissal, but as I was trying to get a blender out of our cabinet, a rogue, bent blade found a way to jam itself into my hand. There was some bleeding, and some scared kids, and some kids who yelled "kitchen safety, Miss Crocker!".

So, thankfully, this recipe came out perfect! It might be my go to chocolate cupcake recipe. Everyone commented on how moist the cakes were. AND, it doesn't even require eggs. So, I'm guaranteed to always have everything this recipe needs on hand. As the cupcakes were cooling and I was putting away the ingredients, the next kitchen disaster struck. A whole, giant bottle of vegetable oil slipped out of my hands, fell to the floor, and the plastic cap broke right off, spilling oil all over the kitchen floor. Not only is oil a total bitch to clean (pardon the language), but I have a 5 month old puppy. Yeah. Luckily Dan was able to grab her and crate her while I got to cleaning up the spill.

The pumpkin spice cream in this recipe is fantastic. If I had thought it out before hand, I would have filled the cakes and piped some of the top with the chocolate buttercream. There's no pumpkin involved, just the spices you would find in a pumpkin pie. I used my pumpkin pie spice from Trader Joes, which is a little different than your standard pumpkin pie spices, but you can use the regular cinnamon, nutmeg and cloves.

Chocolate Pumpkin Spice Cupcakes
adapted from A Farmgirl's Dabbles

For the cake:
3 cups flour
6 tbsp. cocoa powder
1 tsp salt
2 cups sugar
2 tsp baking soda
2/3 cup vegetable oil
2 tbsp. vinegar
2 cups cold water
2 tsp vanilla

For the cream filling:
1 cup unsalted butter, softened
1 jar marshmallow crème (like Fluff)
3 tsp Trader Joe's Pumpkin Pie Spice
OR 2 tsp cinnamon, 1/2 tsp ginger, 1/4 tsp nutmeg, 1/4 tsp allspice, 1/8 tsp cloves

For the frosting:
1 cup unsalted butter, softened
3-4 cups powdered sugar
1/4 cup heavy whipping cream
1 tsp vanilla
1/4 tsp cinnamon
6 oz. semi-sweet chocolate, melted and cooled

1. Preheat oven to 350. Line 2 muffin pans with liners.
2. In a large bowl, whisk together the dry cake ingredients. Make 3 small wells in the dry ingredients.
3. In a small bow combine the oil and vinegar and pour into the well in the dry mix. Pour cold water on top of everything and mix with a fork.
4. Add vanilla and mix.
5. Fill each liner 2/3 full and bake for 25 minutes or until a toothpick comes out clean. Let cool.
6. For the filling, beat together the butter and marshmallow. Add in the spices and mix until fully combined and fluffy.
7. For the frosting, beat the butter until smooth and fluffy in the bowl of a stand mixer. With the mixer on low, add the powdered sugar one cup at a time. Once the sugar is mixed in enough to not "puff out" (as I call it), increase the speed to high and give it a good mixing for a minute or two.
8. Return speed to low and add the cream, vanilla and cinnamon and mix until combined.
9. Add the chocolate and beat on high speed for 2 minutes until nice and whipped and fluffy.
10. To assemble, cut out the centers of each cupcake and fill with marshmallow cream. Pipe chocolate frosting on top and eat!

Everyone loved these. They said they were some of the best yet. The cake was moist and the perfect amount of chocolate, not overbearing, and the cream filling was a nice flavor with the chocolate.


Thursday, December 12, 2013

Gingerbread Fudge

I'm actually surprised that I've never made fudge before. I've always looked for easy-to-make desserts, and fudge is just something that I always look over. Maybe it's because I don't find fudge as pretty or fancy as a cake or cupcake. I also can eat a piece of fudge the size of a penny and be satisfied for months, so it's not a dessert I go for if I see it. I'm trying to branch out my dessert repertoire, so I figured I'd try out some fudge. I started with this recipe, which was the easiest I could find.

I even got a few people to sample some tonight, and everyone agreed - it was delicious. My only issue (and it's one I even premeditated) was the white chocolate chips I used never fully melted, so there were some tiny pieces of white chocolate speckled through the fudge. Everyone else liked that about it, I didn't. When I was at the store grabbing white chocolate, I was debating between regular chips, a better brand of chips, or some white baker's chocolate. The baker's chocolate was not the economical choice with the amount I needed, so I grabbed the standard chips. Next time I'll try melting them differently or use better chocolate.

Gingerbread Fudge
from Sweet 2 Eat Baking

12 oz white chocolate, chopped (or chips)
3/4 cup sweetened condensed milk
2 tsp. ground ginger
1/2 tsp. cinnamon
1/2 tsp. nutmeg

1. Prepare an 8x8 pan by lining it with foil.
2. In a microwave safe bowl, combine the white chocolate and sweetened condensed milk. Heat for 2-3 minutes (in 30 second increments) until white chocolate is almost fully melted, mixing between each heating.
3. Mix in spices immediately and keep mixing to get everything combined and smooth.
4. Pour into the prepared pan and let it set, either at room temp or in the fridge. Our house is cool enough that I could let it set at room temp. It was ready to serve in 4 hours.


From the Box: Hickory BBQ Beef

I rarely make the same thing twice, with the exception of some basic weeknight meals, such as steak tips, stir-frys, spaghetti, etc. I love to grab easy dinner starters at the store for those nights when I need something quick, but then I end up finding recipes on Pinterest or elsewhere to make, and our cabinets end up overloaded with unused items. This past week I decided it was time to use some things we already have here at home. Kraft makes recipe starters, and this shredded beef one looked great. No only do you just have to buy a beef roast for it, but it's in the crock pot. There is literally no work to this other than putting the beef in the crock pot, then pouring two items into the crock pot, and taking 2 minutes (or less) to shred the beef. I spent 3 minutes this morning preparing it. I took the beef out of the fridge, put it in the crock pot and then poured the bottle of simmer sauce on it. I turned the crock pot to low and left for work. I am not a morning person, so this is just about the only meal prep you'll ever see me do before work.


Grab one of these (or another variety) off the shelf. This was great. Sometimes, pre-packaged seasonings and sauces are too salty, but this wasn't. I even tasted the beef after it cooked with simmer sauce (pre-bbq sauce) and it was great that way. I'll definitely be trying more varieties of these recipe makers.

Hickory BBQ Beef

1 package Kraft Recipe Makers Hickory BBQ Beef
includes: simmer sauce and finishing sauce
1 (2-2.5 lb) beef chuck roast
sandwich rolls

1. Place beef roast in the crock pot. Top with included brown sugar and cider vinegar simmer sauce.
2. Cook on low 8-10 hours.
3. Shred the beef and pour in the included sweet hickory BBQ sauce. Mix, heat through and serve.

I ate mine on a bulky roll with a little bit of creamy bacon ranch dressing, because why not? The meet was tender and the sauces are full of flavor.

Monday, December 9, 2013

Chocolate Cupcakes with Brown Sugar Buttercream

I can't believe I didn't bake last week...

This feels so overdue, even though the last time I baked was maybe a little over a week ago.

I need to get back to cupcakes totally from scratch. Even though I love the ease of a doctored boxed mix, there's nothing like a good old-fashioned, homemade from scratch, dessert. I also realized that I'm not the biggest fan of Devil's Food Cake. I prefer a denser cake, and devil's food is a little too fluffy for me. I like a cake that stands up to the frosting, where the frosting doesn't overpower it. Devil's food is just a little too fluffy for me I guess.

To each their own.

Anyways, I was really hoping for a snow day today, or at least a delay, but alas, we all braved the crazily slow-moving traffic this morning through the snow and slick slush and went to work. Granted, this was no major storm, but when people are arriving to work 20 minutes late because of traffic build up due to bad weather and student drivers, it just seems like a delay would've been useful. The one good thing about this first real winter "storm" is that I finally have a garage! No more cleaning my car off in the morning, only after work when needed. No stepping into the slush and puddles to get in and out of my car at home! Some of the joys of home ownership with a garage. I quickly stopped at the store after work today because I have a student's birthday tomorrow and grabbed a brownie mix and some frosted sugar cookies. The brownies are baking as I write this, and I'm enjoying a cupcake made last night.

I know, I'm actually eating one of my cupcakes....

This cupcake was a hit with Dan and a hit with co-workers, but not so much with me. The fluffiness of the cake and the heaviness of the frosting just didn't do it for me. Plus, and I knew this would be the outcome, the frosting is very grainy from the brown sugar in it. I knew it would be, but I guess I was just hoping I would like it, but I hate grainy frosting. I don't want to bite into a soft and delicious cupcake and then have to chew the sugar crystals in my frosting. I also wanted to make the frosting with a little bit of Bailey's in it, but the Bailey's bottle in the cabinet was empty. I certainly didn't empty it, and I don't think the dogs are imbibing while we're at work...

The Bailey's would've made it better...

Chocolate Cupcakes with Brown Sugar Buttercream
from Your Cup of Cake

1 box Devil's Food cake mix
3 eggs
1/2 cup oil
3/4 cup buttermilk
1/2 cup sour cream
2 tsp. vanilla

2 sticks unsalted butter, room temp
1 tsp. vanilla
3-4 cups powdered sugar
3-4 tbsp. milk or cream
1/3 cup lightly packed brown sugar (be sure there are no hard lumps in it!)

1. Preheat oven to 350 and line 2 muffins pans with liners (my batch made 18 cupcakes).
2. In the bowl of a stand mixer, combine the eggs, oil, buttermilk, sour cream and vanilla. Sift in the cake mix and stir to combine.
3. Fill liners 2/3 full and bake for 17-22 minutes until a toothpick comes out clean. Let cool.
4. For the frosting, beat the butter until smooth and creamy.
5. Add the vanilla and mix. Add the powdered sugar one cup at a time, alternating with the tablespoons of milk or cream, mixing well after each addition. If it's too thick, add more milk, if it's too thin add more sugar. Don't forget you will be adding the brown sugar.
6. Slowly add in brown sugar, stirring to combine.
7. Frost cupcakes and eat!


Monday, December 2, 2013

Quick & Easy Stromboli

Returning to work after an extra long weekend is always a long day. Not only had I gotten used to sleeping in a bit later, but work just never stops, so it's just jumping right back into it. A fun and interesting tidbit is that I got a new car this weekend! As fun as new cars are, I always forget what a process it is. Four hours at the dealership, then having to go back today for the inspection, only to find out they messed up my registration, so I have to go back again later this week.  I also had a meeting after work, so I didn't get to the dealership until later. Luckily, since they couldn't do the inspection, I was able to beat some traffic home, or to the grocery store. I also hadn't planned a grocery list for this week, so I had to wing it in the store, which can be dangerous! I settled on making some strombolis for dinner, quick and easy for a long day and rushed afternoon.

There's no real recipe for stromboli. You can get fancy and time-consuming if you want to make your own dough. I stayed simple and quick by buying canned dough and throwing on some easy toppings. I decided to use some shredded steak, bacon, ham, and pepperoni for Dan's (carnivore all the way). For mine, I made it with some steak, bacon, ham, pineapple and some teriyaki sauce. It's sort of my stromboli version of my favorite steak and cheese, which has peppers, onions, ham and teriyaki sauce. Below is what I used to make them, with some brief directions.

1 lb. shredded steak, cooked
6 slices of bacon, chopped and cooked
4 slices deli ham, chopped
10 pepperonis, cut into fourths
1 small can pineapple chunks, cut in half
1/4 teriyaki sauce
2 cups shredded cheese of your choice
2 can pizza dough (such as Pillsbury)
Italian seasoning

1. Preheat oven to 425. If you want to add teriyaki sauce (or another flavoring), mix it in with your ingredients in a small bowl. I mixed my steak, bacon and ham with the sauce.
2. Spread out 1 pizza crust on a clean surface. Spread 1 cup of cheese over dough.
3. Top with desired toppings. Roll up and place seam side down on a greased cookie sheet.
4. Repeat with other crust and toppings.
5. Sprinkle rolled up crusts with Italian seasoning and bake for 15-20 minutes, until golden brown and dough is cooked through.


Thursday, November 28, 2013

Banana Caramel Cupcakes

Happy Thanksgiving!

There's something about the holidays that just wipes me out. And no, it's not the tryptophan. Dan and I are fortunate that we can spend the holidays with both of our families, since we all live about 10-15 minutes apart. But, that's double the food and double the energy, which makes for a long day.

My prepping started yesterday when I started making a pumpkin ginger cheesecake. Water from the water bath got into the pan and sort of ruined the crust. Everything else baked up nicely, but I think I'll try making it again before I post about it. The flavors were great, but the crust was just a big ginger mush. Then, today, I got up at 8 and started the cupcakes. This recipe was great for today because it only made 16 cupcakes, and I had everything for it except for butterscotch chips and caramel. I even had the bananas, I didn't even have to choose this recipe because I had bananas, I wanted to make these and it just so happened I had bananas. It was easy and quick, since I modified it and made a basic buttercream, but my buttercream ended up being super thick. It was so thick my hands hurt trying to ice them. I was happy to have this recipe go smoothly...

...until during transport when the case got bumped and turned over almost all of the cupcakes.....

I guess Thanksgiving wasn't my holiday for baking this year. My cheesy potatoes that I always make for family occasions came out great, but that's a no-brainer.
Banana Caramel Cupcakes
adapted from Susi's Kuchen und Backen Adventures

1 and 1/2 cups cake flour
3/4 teaspoon baking soda
1/2 teaspoon baking powder
1/2 teaspoon salt
3/4 teaspoon cinnamon
2 bananas, mashed (about 1 cup)
1/3 cup buttermilk
1/2 teaspoon vanilla extract
6 tablespoons unsalted butter, at room temperature
3/4 cup packed dark brown sugar
2 large eggs, at room temperature
1/2 cup butterscotch chips


1 and 1/2 stick of unsalted butter, room temp
4-5 cups powdered sugar
1 tsp vanilla
4 tbsp. heavy cream
1/3 cup caramel sauce

1. Preheat oven to 350 and line 16 muffin tins with cupcake liners.
2. In a medium mixing bowl, whisk together the flour, baking powder, baking soda, salt and cinnamon.
3. In a small mixing bowl, mix together the mashed banana, vanilla and buttermilk.
4. In the bowl of a stand mixer, cream together the butter and brown sugar until fluffy.
5. Add the eggs, one at a time, fully mixing in each. Scrape down the sides of the bowl if needed.
6. Add the flour mix in two batches, alternating with the banana mix. Mix until fully combined.
7. Stir in the butterscotch chips.
8. Divide evenly into liners, filling about 2/3 full. Bake for 20 minutes or until a toothpick comes out clean.
9. Let cool.
10. To prepare the frosting, beat the butter until smooth and creamy. Add powdered sugar, one cup at a time, with the mixer on low. After a cup or two, add vanilla and 2 tbsp heavy cream. Add more powdered sugar and add more heavy cream. Add in the caramel sauce and mix until combined. If you want your frosting smoother, add more heavy cream, one tablespoon at a time until your desired consistency. 
11. Frost cupcakes and drizzle with extra caramel sauce.

The cupcakes came out very moist and sticky, and were hard to peel the liners off of, but they were delicious. I think next time I would make a different banana cake that is lighter and not so much banana bread like.


Saturday, November 23, 2013

Chocolate Chunk Gingerbread Stout Cupcakes

In a previous post this week, this one about the honey and beer chicken, I showed 3 different bottles of beer that I purchased for making that dish. One was the winner and the other two were going to be used for other recipes. Well, the hazelnut brown nectar ale didn't last. Dan drank that the other night. The gingerbread stout survived. I was going to use it to make my shepherd's pie with stout gravy , but I forgot that I'm going to Boston to see a play tomorrow, so I may not get time to make it. And the stout gravy that goes with it, is seriously the best gravy ever. I would drink it if I could, by the gallon. I always choose a different stout each time I make it, and it's delicious every time. My favorite so far is the milk stout I used once.

Anyways, I was going to make some honey hazelnut cupcakes to begin with, and then I bought that hazelnut brown nectar ale, so I thought to myself, "Boozy cupcakes instead of virgin cupcakes?!". Well, the ale disappeared. That didn't stop me though. I then thought to myself, "Gingerbread stout cupcakes, with some chocolate chunks perhaps?!" And so, these cupcakes were born. I even stuck with the honey buttercream I had planned to make. Gingerbread and honey go together well, right? The answer to that is: they do. I know this, because I baked these chocolate chunk gingerbread stout cupcakes and topped them with honey buttercream, and even a drizzle of honey for good measure.

These cupcakes almost didn't happen though. Dan and I started our day with a nice sleeping in (love when I get to do that) and then ran a whole bunch of errands. We needed breakfast, truck parts, a trip to the bank, Petco to exchange the broken remote control collar we bought for Lana, and some S hooks for the dogs new ID tags we bought. Tess is staying with my parents (which she does a couple nights a week because my parents can't go that long without seeing her), so Dan, Lana and I set out for our Saturday adventure. We got some coffee (breakfast), went to the bank and then headed to Petco. Lana was lucky enough that my friend was working in the grooming room, so she got a free nail treatment. She also met several other dogs and was howling up a storm. We grabbed some treats, a new collar and newly engraved ID tags for the dogs and headed home. We ordered some lunch and shortly after lunch my day headed downhill. I get chronic migraines, which are becoming more frequent lately. I can always tell when a dull headache is going to become a migraine, and today was one of those time. Off went the lights, off went the TV, and my afternoon/early evening was spent laying in the quiet darkness. I would say that 50% of the time, when I start recovering from a migraine I either get a surge of energy for a while before I crash again, or I just lay like a slug, feeling like I got hit by a truck for the rest of the night.

I got a surge of energy and these cupcakes came to be. Now that you've had a recap of my day (and my health), I bet you want the recipe. I bet you want to know how good these came out. This is another doctored box mix, which may have been while I was able to throw them together. Just a box of cake mix and the ingredients it called for (eggs, oil and water). Except, I replaced the water with stout. Voila!

Yup. They taste as good as they look!


Chocolate Chunk Gingerbread Stout Cupcakes w/ Honey Buttercream
from me and the frosting idea from Half Baked Harvest
made 22 cupcakes

1 box yellow or white cake mix (I had a sugar free yellow mix)
3 eggs
1/3 cup oil
1 cup stout (I used Sam Adams Merry Maker Gingerbread Stout)
1 to 1.5 cups chocolate chunks

1 cup (2 sticks) unsalted butter, room temp
1 tbsp. pure vanilla extract
1/2 cup honey
3-4 cups powdered sugar
4-5 tablespoons of heavy cream

1. Preheat oven to 325 and line 2 cupcake pans with liners.
2. In the bowl of a stand mixer, combine the cake mix, eggs, oil and stout. Beat for 2 minutes until smooth and combined.
3. Fold in chocolate chunks. Divide into cupcake liners and bake for 20-22 minutes. Let fully cool.
4. To make the frosting, in the bowl of a stand mixer, beat together the butter, vanilla and honey until smooth and fluffy. Add the powdered sugar, one cup a time, starting with the mixer on very low speed. Once the sugar is slightly combined, you can increase the speed. If you don't start on low speed, you'll get sugar everywhere (trust me!).
5. To get the desired consistency you want, add cream, one tablespoon at a time, until the frosting is the way you want it. I used 5 tbsp for a smoother, creamier frosting. It was still pretty thick though.


Let me tell you, these are fantastic! As they were baking you could smell the gingerbread. The stout itself has a slight and bitter gingerbread taste (in my opinion, but I am no stout expert). When they came out, it was a warm waft of gingerbread with a big kick of beer aroma. I didn't mind it one bit. The frosting is very sweet due to the honey on top of the sugar, but it paired up very well with the gingerbread cake. The bitterness of the stout off-set the sweetness of the frosting, and the chocolate just gave a nice extra flavor. You can taste all of the different flavors as you eat it, and they go lovely together. The drizzle of honey on top is the icing on the cake (literally).

Cheers!


I know it doesn't look good, but trust me, it is...

Get that frosting ready!


Cupcakes dripping with honey? Yes please!

Thursday, November 21, 2013

Honey and Beer Chicken


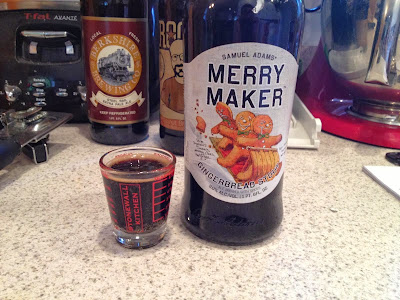
 No, this picture does not signal a rough day or a drinking problem. It signals that my dinner recipe called for beer, I went to get a bottle of pale ale, and of course, had to try others I saw. Variety is the spice of life, right? I am no beer connoisseur. I drink Bud Select 55. The lightest (and what most say is the most tasteless) beer. "Taste's like tinted water" they say. Eh, I enjoy it. It had 55 calories and has the same effects on me as any other beer does. If I go for a fancier beer, I like pale ales and fruity beers. I've been into the Curious Traveler Strawberry Shandy lately, even though summer is over...

I did a taste-testing of all three, just be sure I chose the right one for the recipe. And yes, we own shot glasses and drink glasses, but they're still packed up from the move with no room in the liquor cabinet for them. So, my little measuring shot glass had to do. Don't judge.

Sam Adams Merry Maker Gingerbread Stout

Sam Adams is a maker I don't usually prefer. I've tried so many varieties, and have never found one that I would ever ask for a second bottle of. When I grabbed this bottle, I almost didn't notice that it was Sam Adams. I also started to re-think if I should buy it or not, since I never really like Sam Adams. But, it's the fall, and it's a gingerbread stout, so why not? It has a nice dark color and a slight (and bitter) hint of gingerbread in my opinion. It also left a lingering aftertaste that left me immediately wanting to cleanse my palate. I'm not a big fan of stouts to begin with (remember, Select 55?), unless it's used in my stout gravy for my shepherd's pie. Which by the way, I will be making this weekend just so I can use this in the gravy. 

Rogue Hazelnut Brown Nectar

Hazelnut is not something often found on bottles of beer, so obviously I chose it. It has a nice dark tint, but wasn't as bitter as I was expecting. It had a nice hint of sweetness with a great smooth nutty malt flavor. As far as a darker beer goes, I could drink this. I could also use this in a cupcake recipe. The gears are already turning....

Berkshire Brewing Company Steel Rail Extra Pale Ale
Here's the pale ale I went looking for in the first place. It was nice and light. You could definitely taste the hops, but it wasn't overwhelming like a lot of extra pale ales. This one won the vote for tonight's dinner. Good thing I already plans for the other two bottles. That is, if Dan doesn't get to them before I can use them.

Honey and Beer Chicken

4 boneless, skinless chicken breasts
salt and pepper
2 tbsp canola oil
1 small shallot, sliced
1/2 cup beer (whatever kind you prefer)
2 tbsp soy sauce 
1 tbsp. dijon mustard
1 tbsp honey

1. Season chicken with some salt and pepper.
2. Heat a skillet over medium-high heat. Add oil and swirl. Add chicken and cook for 6 minutes per side until cooked through. Remove from pan and keep warm.
3. Add shallot. Cook for 2 minutes. 
4. Combine beer, soy sauce, mustard and honey and whisk together. Add to the pan.
5. Scrape the pan to scrape up those brown burnt bits that are there. Let the liquid boil until it reduces down to about a 1/2 cup.
6. Return chicken to pan and turn over to coat with sauce.


This recipe was delicious. The second you whisk up the beer, soy sauce, mustard and honey you can just smell how good it will be. I recommend only one tablespoon of soy sauce though, it was a bit salty for me. I love a good and easy chicken recipe.

Now, I'm off to go watch my cousin who's in the local high school production of Les Miserables. She plays a prostitute. Yep, my 17 year-old (baby) cousin is playing a prostitute. The good thing is, the high school's theater program is amazing and gives Broadway a run for its money. 


Wednesday, November 20, 2013

Carnitas Pizza

Every now and then, I get a meal idea in my head. It's one where I build my own recipe. Once it's in there, I have to test it out to see if it was a good idea. I had already decided tonight would be a make-your-own pizza night. Then, Dan changed a shift at work, so he had to work tonight. No big deal, making a pizza for one is just as easy. But, a week ago, I decided I wanted a fancier pizza. You know, not your ho-hum pepperoni, or my favorite Hawaiian. I wanted to get creative, but still make it a quick and easy process, since that's what pizza night is all about. Top a crust, bake it and eat it. So, what would this fancy pizza entail?

In college, out at UMass Amherst, there is the greatest pizza place of all time - Antonio's. You could buy almost any imaginable kind of pizza by the slice until 2am, and it was located right in the town center amidst the bars. Talk about the best money-making plan ever! My three favorite kinds of pizza were tortellini, potato bacon, and BBQ steak bacon. They also this steak fajita style pizza with the best shredded steak and drizzled with creme fraiche. For some reason, that slice stuck in my mind, and I decided to make my own fajita-style pizza, except with some carnitas. So, I got to work researching some different ideas, and then building my own. The only recipe I followed was the one to make the carnitas a day ahead, which can be found going here, or by going to my previous post. Yes, this is a two-day recipe for this pizza, but the first day includes a crock pot recipe that took me 5 minutes to prepare, 5 minutes to shred and 3-4 hours to smell the carnitas cooking all afternoon. I'll take the ten-minute total prep I needed to make the carnitas a day ahead of time, because when it came to making the pizza tonight, I spent another 5 minutes. One minutes to take some leftover carnitas and put it on a pan and another 4 minutes to throw it under the broiler to crisp it up ever so slightly.  What else did I do to prep this pizza? Spent another 10 minutes dicing up some shallots and green pepper and sauteing them. All-in-all, this pizza took about 15 minutes from start to finish, with all ingredients prepped and ready to go. Seriously, this pizza is a pre-made crust, some creme fraiche and cheese, a good dose of carnitas, peppers and shallots and some seasoning to give it a little kick. The seasoning is just an adapted version of the seasoning I used when making the carnitas. This is what you get:


Carnitas Pizza
from my brain

1 pre-made pizza crust (such as Boboli)
1/3 cup creme fraiche
1/4 tsp coriander
1/4 tsp cumin
1/4 tsp cinnamon
1.5 cups pre-made carnitas (see link to recipe above)
1 green pepper and 1 shallot diced and sauteed until soft
1 cup shredded cheese of any variety (I used a pizza blend)

1. To prep, be sure your veggies are sauteed. Crisp up your pork under the broiler if desired. And mix all spices together in a small bowl.
2. Preheat oven to 450.
3. Spread creme fraiche on pizza crust. Sprinkle with shredded cheese. Then, sprinkle half of the seasoning mix over cheese.
4. Top with carnitas, peppers and shallots. Sprinkle remaining seasoning on top of that. Add a little more shredded cheese if desired (I did!).
5. Bake for 8-10 minutes.

This pizza was delicious. I love the seasoning mix. You get a slight little taste of heat and flavor, but not overpowering. The creme fraiche gives the cheese a little bit of a lighter and fresher taste, and the pork is divine.

**For anyone who has never used creme fraiche, I found it in the specialty cheese section of my grocer. It tastes like sour cream, but with more of a cream cheese texture. When heated, it thins out A LOT. I found that out when I went to heat a good spoonful to drizzle on the pizza. Even 10 seconds in the microwave turned it into complete liquid. So when you bake the pizza, it will seem to liquefy and sort of melt into the crust. It still tastes delicious, just changes texture as it cooks!