I don't think this post needs any flashy intro..it's about cheesecake. Chocolate cheesecake. There is Bailey's in this cheesecake. It's topped with dark chocolate ganache.
If you don't want your cheesecake to crack, use a water bath. This is an easy way to have a water bath. Fill a 9x13 pan halfway with water and place it on the bottom rack while the oven preheats, and then while the cheesecake cooks.
Might as well get right to it...
Bailey's Chocolate Cheesecake
from gimmesomeoven
Crust ingredients:
1.5 cups chocolate graham cracker or chocolate cookie crumbs
1/3 cup powdered sugar
1/3 cup unsweetened cocoa powder
1/4 cup butter, melted
Cheesecake ingredients:
3 (8 oz) packages of cream cheese, softened
1 1/4 cups white sugar
1/4 cup unsweetened cocoa powder
3 tbsp all-purpose flour
3 eggs
1/2 cup sour cream
1/2 cup Bailey's or other Irish Cream liqueur
Chocolate Ganache:
1/2 cup heavy cream
4 oz. dark chocolate
1. Preheat oven to 350. In a large bowl mix cookie crumbs, powdered sugar and cocoa. Add melted butter and stir until well combined. Pat into the bottom of a 9" springform pan. Bake for 10 minutes. Increase oven temperature to 450.
2. In a large bowl combine cream cheese, white sugar, cocoa and flour. Beat at medium speed until blended and smooth. Add eggs, one at a time, mixing well between each egg. Blend in the sour cream and Bailey's, mixing on low speed until blended. Pour filling over crust.
3. Place the cheesecake in the oven on the shelf above the water bath, and bake at 450 degrees for 10 minutes. Reduce oven temperature to 250 and continue baking for 60 minutes.
4. With a knife, loosen the cheesecake from the rim of the pan. Let cool. Chill for a few hours until ready to serve. Remove the rim of the pan and top with ganache (instructions below).
Ganache:
Heat the cream in a small saucepan over med-low heat until almost boiling. Pour over the chocolate and let sit for 30 seconds. Stir the chocolate and cream until chocolate has melted and is well combined with the cream.
I also topped it with chocolate shavings because why not?
Monday, December 27, 2010
Chicken Pot Pie Penne
I think I can officially wish everyone a Merry Christmas finally, now that I'm ready to post about the food I made for Christmas. I hope Santa was good to everyone. I got a lot of kitchen things that I'm very happy about. I got my dessert plates and measuring cups from Anthropologie that I wanted. I also got a grill pan, a pizza stone, a 12" bamboo steamer, new mixing spoons, a big glass mixing bowl, some spices, a new oven mitt, 2 cookbooks, some dish towels, and I think that's it for the kitchen items.
Christmas Eve is always a big deal in my family. We go to my grandmother's where she makes potato pancakes that you can eat with butter, or mayonnaise, or salmon. Basically, it's not healthy eating. I contributed to unhealthiness by making Chicken Pot Pie Penne.
Chicken Pot Pie Penne
from here
2 tbsp unsalted butter or olive oil
1 medium onion, finely chopped
2 cloves garlic, minced
10 oz. white or cremini mushrooms, thinly sliced
1 tbsp all-purpose flour
2 cups low sodium chicken broth
1 cup half & half or heavy cream
1 rotisserie chicken, shredded into bite sized pieces
1 cup frozen peas and carrots mix
1 tbsp lemon juice
1 tsp fresh minced thyme
1-2 cups whole wheat dry penne pasta (or any pasta)
1. Cook the pasta according to package directions. When done, place in a large bowl and set aside.
2. Melt the butter in a large skillet over med-high heat. Cook onion, garlic and mushrooms in the skillet until golden brown.
3. Sprinkle flour over the mushroom mixture in the skillet and stir. Cook for a few seconds to rid the floury smell and then add the broth, half & half (or cream) to the skillet. Deglaze the skillet, scraping up any bits of fond at the bottom of the skillet. Reduce heat to med-low and simmer, uncovered, until the liquid is slightly thickened.
4. Add the chicken, frozen peas and carrots, lemon juice and thyme to the skillet. Cook until heated through and season with salt and pepper to taste. Place the hot penne pasta into the skillet and toss to combine.

This is the only recent food item I have a picture of. I was so busy with everything that pictures never really crossed my mind. I also added more pasta than the recipe called for. The pasta should be creamier, similar to the inside of a pot pie, all covered with gravy.
Tortilla and Black Bean Pie
I have not been a good blogger....but I have a good excuse. The holidays are such a crazy time. I did do some cooking, but I cut back a little due to various Christmas parties and activities that had food there and eating more of other people's cooking. On the 18th, we had a yankee swap at the bar and I made Tortilla and Black Bean Pie. Actually I made three of them.
I adapted the recipe a little to suit my needs. It is regularly a meatless dish, but I added some ground hamburg with some taco seasoning to it, as the crowd was more meat-eaters. I also didn't make it in a springform pan, which is why I made three. I used regular disposable pie pans which are not as deep as a springform, so the 8 layers ended up as 2 layers per pan.
Tortilla and Black Bean Pie
4 (10") flour tortillas
1 tbsp. canola oil
1 large onion, diced
1 jalapeno chile, seeded and minced
2 cloves garlic, minced
1/2 tsp. ground cumin
coarse salt and ground pepper
2 (15oz) cans black beans, rinsed and drained
12 oz. beer or 1.5 cups water
1 (10oz) package of frozen corn
4 scallions, thinly sliced
8 oz. shredded mexican cheese
sour cream and salsa for serving
1. Preheat oven to 400. Using a paring knife, trim tortillas to fit a 9" springform pan, using the bottom of the pan as a guide. Set aside.
2. Heat oil in a skillet over medium heat. Add onion, jalapeno, garlic, and cumin; season with salt and pepper. Cook, stirring occasionally, until onion is softened 5-7 minutes.
3. Add beans and beer to skillet and bring to a boil. Reduce heat and simmer until the liquid has almost evaporated, 8-10 minutes. Stir in corn and scallions and remove from heat. Season with salt and pepper.
4. Fit a trimmed tortilla into the bottom of the springform pan; layer with 1/4 of the beans and sprinkle evenly with some of the cheese. Repeat three times, using all of the remaining cheese on the top layer. Bake until hot and cheese is melted, 20-25 minutes. Unmold pie and serve in slices with sour cream and salsa.
I don't have any pictures of this, as I was rushing around. It was pretty good though and people seemed to enjoy it.
Monday, December 13, 2010
Asparagus Stir-Fry
I realize that it has been a week since my last post, but I had a lot of opportunities to not cook last week and I took them. It saved me some money (since I had been spending like crazy on food) and I was able to buy a couch yesterday! Not from saving that much money from not grocery shopping, but it gave me a little extra.
This past weekend I went out to dinner with the girls, had the ladies yankee swap, which had sooooo much good food, and bought my new couch. After grocery shopping for last night's dinner, I was glad I had only planned for one night of cooking. I had almost forgot that my cousin is here from Florida and we are having a Chinese food dinner tonight to celebrate.
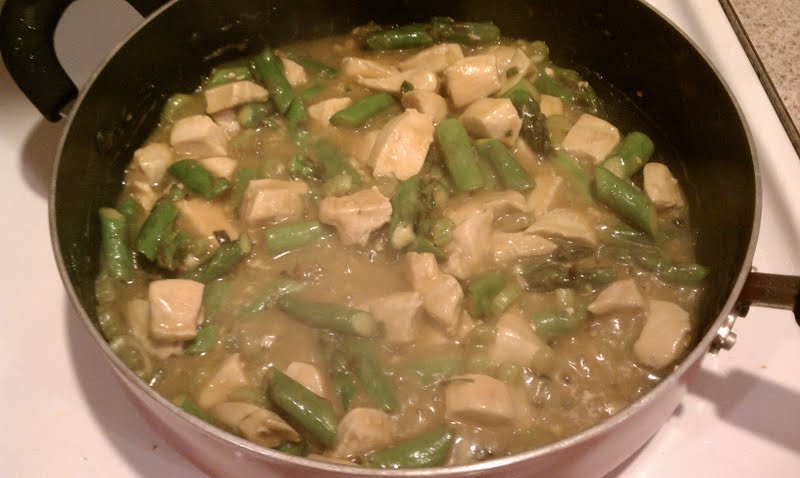
I decided to make something I have made several times. I made Asparagus Stir-Fry. It's quick and easy and decently healthy.


Asparagus Stir-Fry
from: no idea???
4 tbsp. cooking oil, divided
1 cup sliced celery
4 cups fresh asparagus pieces
1/2 cup sliced green onions
4 skinless, boneless chicken breasts, cut into 1" strips
2 tsp. grated orange peel
1 garlic clove, minced
1/2 cup water
2 tbsp. orange juice concentrate
4 tsp. cornstarch
1. In a large skillet or wok, heat 2 tbsp. of oil over med-high heat. Stir-fry celery for 1 minute. Add asparagus and onions, and stir-fry 3-5 minutes or until asparagus is crisp-tender. Transfer to a bowl and set aside.
2. Add remaining oil to the skillet. Stir-fry chicken, garlic and orange peel for 3-4 minutes or until chicken juices run clear.
3. Combine the water, soy sauce, OJ concentrate, and cornstarch; add to skillet along with vegetables. Cook and stir for 3 minutes or until sauce is thickened and vegetables are heated through.
4. Serve over rice.
This past weekend I went out to dinner with the girls, had the ladies yankee swap, which had sooooo much good food, and bought my new couch. After grocery shopping for last night's dinner, I was glad I had only planned for one night of cooking. I had almost forgot that my cousin is here from Florida and we are having a Chinese food dinner tonight to celebrate.
I decided to make something I have made several times. I made Asparagus Stir-Fry. It's quick and easy and decently healthy.


Asparagus Stir-Fry
from: no idea???
4 tbsp. cooking oil, divided
1 cup sliced celery
4 cups fresh asparagus pieces
1/2 cup sliced green onions
4 skinless, boneless chicken breasts, cut into 1" strips
2 tsp. grated orange peel
1 garlic clove, minced
1/2 cup water
2 tbsp. orange juice concentrate
4 tsp. cornstarch
1. In a large skillet or wok, heat 2 tbsp. of oil over med-high heat. Stir-fry celery for 1 minute. Add asparagus and onions, and stir-fry 3-5 minutes or until asparagus is crisp-tender. Transfer to a bowl and set aside.
2. Add remaining oil to the skillet. Stir-fry chicken, garlic and orange peel for 3-4 minutes or until chicken juices run clear.
3. Combine the water, soy sauce, OJ concentrate, and cornstarch; add to skillet along with vegetables. Cook and stir for 3 minutes or until sauce is thickened and vegetables are heated through.
4. Serve over rice.
Monday, December 6, 2010
Pasta Dish
The cold weather is already bumming me out. It was in the 30s today, and made me want to do nothing but cuddle under a blanket. Instead of grocery shopping, I scrounged through my cabinets to see what I could finagle with the supplies I had. That gave way to my Chicken Langostino Spicy Pasta Dish.
I used 3 kinds of pasta that I left in boxes. I had some fettuccine, spaghetti, and whole wheat spaghetti. I also had a jar of garlic and herb pasta sauce, frozen langostino tails, jalapeno and chili oil, garlic, and red pepper flakes. Langostino tails are like a mix of shrimp and lobster (at least I think so).
Mum came home and smelled my kitchen and asked if I had enough to share. Since I have no self-control when cooking pasta, I definitely had 3 full servings. She gave me some chicken to throw in, as the langostino tails were on the fewer side, and she made some garlic toast. She also supplied some shredded asiago cheese to top it with. Perfect!
There isn't really a recipe for this. I cooked the pasta and threw the langostino tails (which you can get at Trader Joe's) in a skillet over med-high heat with some jalapeno and chili oil and minced garlic. I sprinkled some red pepper flakes on top. I added the chicken (which was pre-cooked and just needed to be heated through) to the skillet later and added in more oil and pepper as needed to my taste. I threw a cup of pasta sauce in with my cooked pasta to lightly coat it. I served it all together on a plate.


I got my new Clean Eating magazine in today, and there are so many good recipes to try...can't wait!!!!
Wednesday, December 1, 2010
Dulce de Leche and Chocolate Chunk Bread Pudding
So I took a poll on which dessert I should make tonight. I usually get several comments on every food post I make on Facebook...but I got 2 votes yesterday. Where were you all when I needed your input most??? Anyways, the 2 people made the same vote, so Dulce de Leche it is.
How much of a novice cook am I? The recipe called for egg bread....and I googled egg bread. Yes. I googled egg bread. Turns out it's Challah bread. Why don't they just say that? I got the last loaf of Challah in the store (score!). I also pulled all the stops and bought Ghirardelli brand bittersweet
chocolate chips...
...that's not true. I wasn't trying to be fancy, it was the only brand that sold bittersweet chips in the store.
Also, today this was the second recipe that I overlooked an ingredient and forgot to pick something up for it. I forgot the onions in the French Onion Mac...I know, I know...it's right in the name! And I forgot to grab a nip of rum for the bread puddings. Luckily, our dear friend Steven who passed away not long ago was a liquor enthusiast and in-between trips to England, Canada and here, he would bring us back some sort of scotch or rum to try. He talked on and on about Gosling's Black Rum, and I found it in my parents' liquor cabinet. I am not a rum person...one horrifying night of too much Captain has ruined it for me forever. Even pouring my measly 2 tablespoons of it made me cringe. Ok, back to photos of challah!

Dulce de Leche and Chocolate Chunk Bread Pudding
from Bon Appetit Desserts
8 1/2-inch thick slices egg bread, crusts trimmed, cut into 3/4 to 1-inch cubes
4 tbsp unsalted butter, melted, divided
1.5 cups heavy whipping cream
1 cup purchased dulce de leche or butterscotch caramel ice cream topping
4 large eggs
2 large egg yolks
2 tbsp dark rum
1 tsp vanilla extract
pinch of salt
1/2 cup bittersweet chocolate chips
2 tbsp sugar
powdered sugar
1. Preheat oven to 350. Place bread cubes in a large bowl. Drizzle with 3 tablespoons of melted butter; toss. Transfer to a rimmed baking sheet. Bake until bread begins to color, stirring occasionally, about 12 minutes. Cool, brush 11x7x2-inch glass baking dish with remaining melted butter.
2. Stir cream and dulce de leche topping in a medium saucepan over medium heat until well blended and bubbling. Remove from heat. Whisk eggs and yolks in a large bowl. Add rum, vanilla, and salt; gradually whisk in warm dulce de leche mixture. Stir in bread cubes. Let soak 30 minutes, stirring occasionally.
3. Mix chocolate chips into custard mixture; transfer to prepared dish. Sprinkle with 2 tablespoons of sugar. Bake pudding until puffed and set in center, about 35 minutes. Cool 15 minutes. Sift powdered sugar over pudding. Serve warm with additional dulce de leche sauce.
It tastes as good as it looks and sounds.
How much of a novice cook am I? The recipe called for egg bread....and I googled egg bread. Yes. I googled egg bread. Turns out it's Challah bread. Why don't they just say that? I got the last loaf of Challah in the store (score!). I also pulled all the stops and bought Ghirardelli brand bittersweet
chocolate chips...
 | |
| Challah! |
 |
| Sliced challah |
...that's not true. I wasn't trying to be fancy, it was the only brand that sold bittersweet chips in the store.
Also, today this was the second recipe that I overlooked an ingredient and forgot to pick something up for it. I forgot the onions in the French Onion Mac...I know, I know...it's right in the name! And I forgot to grab a nip of rum for the bread puddings. Luckily, our dear friend Steven who passed away not long ago was a liquor enthusiast and in-between trips to England, Canada and here, he would bring us back some sort of scotch or rum to try. He talked on and on about Gosling's Black Rum, and I found it in my parents' liquor cabinet. I am not a rum person...one horrifying night of too much Captain has ruined it for me forever. Even pouring my measly 2 tablespoons of it made me cringe. Ok, back to photos of challah!
 | ||
|


 |
| Dulce deliciousness... |
Dulce de Leche and Chocolate Chunk Bread Pudding
from Bon Appetit Desserts
8 1/2-inch thick slices egg bread, crusts trimmed, cut into 3/4 to 1-inch cubes
4 tbsp unsalted butter, melted, divided
1.5 cups heavy whipping cream
1 cup purchased dulce de leche or butterscotch caramel ice cream topping
4 large eggs
2 large egg yolks
2 tbsp dark rum
1 tsp vanilla extract
pinch of salt
1/2 cup bittersweet chocolate chips
2 tbsp sugar
powdered sugar
1. Preheat oven to 350. Place bread cubes in a large bowl. Drizzle with 3 tablespoons of melted butter; toss. Transfer to a rimmed baking sheet. Bake until bread begins to color, stirring occasionally, about 12 minutes. Cool, brush 11x7x2-inch glass baking dish with remaining melted butter.
2. Stir cream and dulce de leche topping in a medium saucepan over medium heat until well blended and bubbling. Remove from heat. Whisk eggs and yolks in a large bowl. Add rum, vanilla, and salt; gradually whisk in warm dulce de leche mixture. Stir in bread cubes. Let soak 30 minutes, stirring occasionally.
3. Mix chocolate chips into custard mixture; transfer to prepared dish. Sprinkle with 2 tablespoons of sugar. Bake pudding until puffed and set in center, about 35 minutes. Cool 15 minutes. Sift powdered sugar over pudding. Serve warm with additional dulce de leche sauce.
It tastes as good as it looks and sounds.
French Onion Mac & Cheese
Oh gruyere, you've done it again! I used up my leftover gruyere to make some French Onion Mac & Cheese. I don't even know what to say about this dish, other than it's delicious and I have an absurd amount of leftovers. I got it from Rachel Ray's magazine when Mum was purging them. It's part of my mac & cheese recipe collection. I have some great variations on the classic dish, and this one lived up to my mac & cheese expectations.
A really handy tool that I have that made this more fun (at least I think it's fun...) is my Ikea shredder bowl. It comes with two shredder tops, one regular and one more grated and two bowls with covers for shredding and storing leftovers. Ikea, you truly are the Disneyland for adults who love homegoods.
French Onion Mac & Cheese
from Everyday with Rachel Ray
4 tablespoons butter
2 large onions, very thinly sliced
1 tsp ground thyme
1 bay leaf
salt and pepper
1 lb. penne rigate or whole wheat penne rigate
2 tbsp flour
1 cup chicken stock
1 cup whole milk
freshly grated nutmeg
3/4 lb. gruyere, shredded
1. In a skillet, melt 2 tablespoons of butter over medium-high heat. Stir in the onions, thyme and bay leaf for 5 minutes; season with salt and pepper. Lower the heat and cook until the onions are browned, 10 to 15 minutes. Transfer to a plate and discard the bay leaf. Reserve the skillet.
2. Meanwhile, cook pasta until al dente. Drain and return to pot.
3. In the reserved skillet, melt the remaining 2 tablespoons of butter over medium heat. Whisk in the flour for 1 minute, then whisk in the chicken stock and milk. Bring to a boil; season with salt, pepper and nutmeg. Lower heat and cook until thickened, about 5 minutes. Stir in cheese until melted.
4. Combine onions and sauce with the pasta and toss well.
 | |||
| Gruyere & Smoked Guyere! |
 | ||
| $4 (for a set of 2!) |
 | ||
| It does such wonderful things! |
 | ||
| I need to work on photography skills..... |
French Onion Mac & Cheese
from Everyday with Rachel Ray
4 tablespoons butter
2 large onions, very thinly sliced
1 tsp ground thyme
1 bay leaf
salt and pepper
1 lb. penne rigate or whole wheat penne rigate
2 tbsp flour
1 cup chicken stock
1 cup whole milk
freshly grated nutmeg
3/4 lb. gruyere, shredded
1. In a skillet, melt 2 tablespoons of butter over medium-high heat. Stir in the onions, thyme and bay leaf for 5 minutes; season with salt and pepper. Lower the heat and cook until the onions are browned, 10 to 15 minutes. Transfer to a plate and discard the bay leaf. Reserve the skillet.
2. Meanwhile, cook pasta until al dente. Drain and return to pot.
3. In the reserved skillet, melt the remaining 2 tablespoons of butter over medium heat. Whisk in the flour for 1 minute, then whisk in the chicken stock and milk. Bring to a boil; season with salt, pepper and nutmeg. Lower heat and cook until thickened, about 5 minutes. Stir in cheese until melted.
4. Combine onions and sauce with the pasta and toss well.
Monday, November 29, 2010
Berry-berry Streusel Bars
The meeting I was supposed to go to tonight got canceled...thankfully. But, that means I know have these streusel bars sitting on my counter.....
I wanted to make something easy and quick, and this was pretty simple. They are still cooling but they smell delicious!
Berry-berry Streusel Bars
from Bon Appetit: Fast Easy Fresh
Crust:
1.5 cups old-fashioned oats
1.5 cups all purpose flour
1 cup packed brown sugar
1/2 tsp baking soda
1 cup (2 sticks) chilled, unsalted butter, cut into small pieces
Filling:
1 12-oz. package frozen blueberries, thawed
2/3 cup raspberry jam
5 tsp all purpose flour
1.5 tsp minced lemon peel
For the crust: preheat oven to 375. Mix the first four ingredients together. Add the butter and rub into mixture with fingertips until mixture resembles coarse meal. Press half of the mixture into a buttered 9x13x2 glass baking dish. Bake crust until lightly brown, about 15 minutes. Cool slightly.
For the filling: Mix all ingredients in a bowl.
Spread the filling over the crust and sprinkle remaining crumb mixture over fruit. Bake until topping is golden, about 35 minutes. Cool in pan.
My phone is now not letting me send pictures to my email. I will have to edit this later.
Bourbon Stuffed Peppers
I've mentioned on here before that I've been to some Tastefully Simple parties (and am going to another one this Friday). I've bought some of there dip mixes and glazes, etc. I've been dying to try their Bayou Bourbon Glaze, and had a recipe planned for WEEKS. Sunday, I chose an all new recipe to use it in all-together. I went to the product's website, where they have tons of recipes you can use their products in and chose one that sounded more appealing. I went with stuffed peppers because I love the. Simple as that. One thing I do regret is not conferring my dinner plans with Mum. She made chili. I wanted her food, she wanted my food. Luckily there are leftovers.
Bourbon Stuffed Peppers
from here
4 -5 green bell peppers
1 lb. ground beef
1 Tbsp. Garlic Garlic™
1 Tbsp. Onion Onion™
3 Tbsp. Bayou Bourbon™ Glaze
1 tsp. Worcestershire sauce
2 cups cooked rice
2 (8 oz.) cans tomato sauce
1/2 cup shredded mozzarella cheese
Directions
Cut tops off each pepper; remove seeds and set aside. In a large pan, brown ground beef and drain. Add remaining ingredients except for cheese; simmer for 2-3 minutes. Fill each pepper with mixture. Place in an 8 x 8 pan. Bake at 350° for 50 minutes. Top each pepper with cheese and bake an additional 10 minutes. Makes 4 servings.
There was enough mix to fill 5 peppers. I also didn't have Worcestershire sauce like I thought I did, and I used Cheddar Jack cheese because I had it on hand. I also didn't have a charged phone to take photos. They looked good though...promise!
I have my dessert in the oven right now, and once it comes out I will snap a photo of it and it will be posted!
Sunday, November 28, 2010
Rigatoni with Butternut-Gruyere Sauce
I am on a roll with using leftovers in my cooking. Today, I used up the leftover pureed squash I had for a pasta recipe that sounded super yummy. I did make one slight mistake when I was cooking, I set my herbs aside and never added them into the sauce. I never even noticed until I was cleaning up. Oh well! It was good regardless. I am saving then dessert I was going to make tonight for tomorrow to bring to a meeting I'm going to.
I have also decided today that they should have a channel that plays nothing but Alton Brown all day. I'm watching him on the Cooking Channel right now and he is eating lutefisk, which is making my pasta in belly not settle so well. I'd like to say that I'm adventurous in my appetite, but I'm not sure I could ever eat lutefisk, or haggis, or headcheese.
Let's go back to discussing really yummy foods...like butternut squash and gruyere cheese. Today, while grocery shopping I discovered smoked gruyere. How have I never seen this before??? I buy gruyere a few times a year and have bypassed the smoked gruyere somehow. I bought some just to try it and ended up putting it into my sauce. I'm not sure I can eat regular gruyere ever again...

Rigatoni with Butternut-Gruyere Sauce
adapted from here
1 medium, or 1 pound butternut squash (I used leftover pureed squash)
1 medium onion, finely diced
1 clove garlic, diced
olive oil
kosher salt
2 cups milk or cream
4 tablespoons butter
1 cup Gruyère cheese, grated
1 pound rigatoni pasta
1 cup fresh sage, chopped
2 tablespoons freshly chopped flat leaf parsley
1. Preheat oven to 350 degrees. Cut butternut squash in half and remove seeds and stringy parts. Reserve seeds for roasting if desired. Drizzle halves with olive oil and sprinkle with a little kosher salt. Place cut side down on a cookie sheet and roast at 350 degrees until very fork tender, about 1 hour.
2. Once squash is done, cook pasta according to package directions and drain well. Preheat large skillet. Drizzle with olive oil. Add onion and garlic. Saute over medium heat until translucent. Scoop roasted squash away from the skin and add to skillet. Add butter and milk. Heat through. Remove from heat and add sage, parsley and cheese. Mix until cheese has melted. Serve with crusty bread.
My sauce was thinner than this recipe calls for, just because the squash was pureed beforehand, but if you let the sauce sit for about 10 minutes it thickens up (I learned this when I was packing up leftovers). I also sprinkled some shredded smoked gruyere on top, and the bits with a lot of it on it were the yummiest. Oddly enough, and not planned at all, a recipe I'm planning on making later in the week calls for gruyere. I'll have to go buy some more as I used up quite a bit today, but I have a little leftover. The leftover cooking continues!
Friday, November 26, 2010
Lasagna Roll-ups
Yesterday, I made Butternut Squash Lasagna for Thanksgiving. The recipe can be found under my September archives. I decided to cook the entire box of lasagna noodles, just in case I wanted to make the lasagna bigger, and if not, then I would use them for roll-ups. The roll-ups won that battle.
I looked up some recipes trying to find one that incorporated what I had in my fridge. After reading many that required spinach (that I wish I had) and Italian sausage (which isn't my favorite), I decided that it would be easy enough to wing it. I crossed my fingers and got to work.
Lasagna Roll-ups
6-8 lasagna noodles, cooked al dente
7-8 oz. ricotta cheese (i used fat free ricotta)
1/2 cup shredded mozzarella + some to top
2 eggs, lightly beaten
1.5 tsp oregano
1 tsp garlic powder
1/2 tsp onion powder
1/4 to 1/2 lb of ground beef
marinara sauce
1.Preheat oven to 325.
2. Brown ground beef in a skillet over med-high heat.
3. In a bowl, mix together cheeses, eggs, oregano, garlic and onion powder.
4. Lay out lasagna noodles. Top with heaping spoonfuls of cheese mixture, ground beef, and marinara sauce. Roll up and place in a glass baking dish with marinara sauce on the bottom.
5. Top with more marinara and bake for 20 minutes.
6. Sprinkle mozzarella cheese over rolls and bake for another 10 minutes.
I wish I had added in more garlic, either fresh minced garlic or cooked the ground beef in garlic. Other than that they were awesome. While I waited for them to cook I snacked on a warm Chocolate Chip Banana Muffin.
Can't beat a day of easy no-fuss cooking and relaxation!
I looked up some recipes trying to find one that incorporated what I had in my fridge. After reading many that required spinach (that I wish I had) and Italian sausage (which isn't my favorite), I decided that it would be easy enough to wing it. I crossed my fingers and got to work.
 |
| I started with the noodles |
 |
| And topped them with a yummy cheesy mixture |
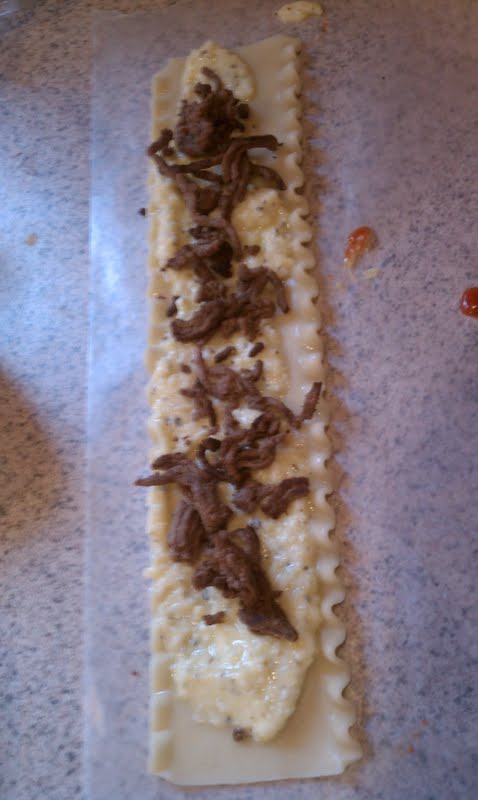 | ||
| Followed by some ground beef |
 |
| And some marinara |
 |
| Rolled them up tight |
 |
| Baked them |
 | ||
| Put one on a plate and ate it! |
6-8 lasagna noodles, cooked al dente
7-8 oz. ricotta cheese (i used fat free ricotta)
1/2 cup shredded mozzarella + some to top
2 eggs, lightly beaten
1.5 tsp oregano
1 tsp garlic powder
1/2 tsp onion powder
1/4 to 1/2 lb of ground beef
marinara sauce
1.Preheat oven to 325.
2. Brown ground beef in a skillet over med-high heat.
3. In a bowl, mix together cheeses, eggs, oregano, garlic and onion powder.
4. Lay out lasagna noodles. Top with heaping spoonfuls of cheese mixture, ground beef, and marinara sauce. Roll up and place in a glass baking dish with marinara sauce on the bottom.
5. Top with more marinara and bake for 20 minutes.
6. Sprinkle mozzarella cheese over rolls and bake for another 10 minutes.
I wish I had added in more garlic, either fresh minced garlic or cooked the ground beef in garlic. Other than that they were awesome. While I waited for them to cook I snacked on a warm Chocolate Chip Banana Muffin.
Can't beat a day of easy no-fuss cooking and relaxation!
Chocolate Chip Banana Muffins
So today is using up leftovers day...except I mainly used non-Thanksgiving leftovers. For this recipe, I didn't use any Thanksgiving leftovers. I wanted to use up the rest of the bananas I had after my attempted Banana Cream Pie....which ended up more like Banana Cream Soup. Oh well, next time, I will perfect it.
Chocolate Chip Banana Muffins
3 or 4 mashed bananas
1/3 cup melted butter
1 tsp vanilla
1 cup sugar
1 egg, beaten
1 tsp baking soda
pinch of salt
1.5 cups of flour
1 cup chocolate chips
1. Preheat oven to 350 and grease muffin tin.
2. Mix mashed bananas with the melted butter.
3. Add vanilla, sugar and egg and mix until incorporated.
4. Sprinkle baking soda and salt on top of mixtures and stir it in.
5. Add the flour and mix well.
6. Fold in the chocolate chips.
7. Pour mixture into muffin cups, filling cups 3/4 full.
8. Bake for 20-25 minutes then cool on a wire rack.
I am not a huge banana fan, but apparently this week banana was just calling my name. At least I did not have 2 failed banana dishes. These were delicious and my kitchen smelled wonderful...until I made lasagna roll-ups and masked the banana scent.
 |
| I started by mashing some bananas with some melted butter |
 |
| Then added vanilla, egg and sugar |
 |
| Then sprinkled on some baking soda and salt from an elephant |
 |
| Mixed in some flour |
 |
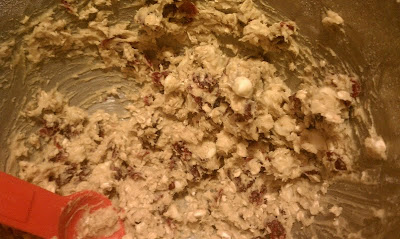
| Folded in some chocolate chips |
 | |||
| Which all magically mixed together and turned into muffins! |
3 or 4 mashed bananas
1/3 cup melted butter
1 tsp vanilla
1 cup sugar
1 egg, beaten
1 tsp baking soda
pinch of salt
1.5 cups of flour
1 cup chocolate chips
1. Preheat oven to 350 and grease muffin tin.
2. Mix mashed bananas with the melted butter.
3. Add vanilla, sugar and egg and mix until incorporated.
4. Sprinkle baking soda and salt on top of mixtures and stir it in.
5. Add the flour and mix well.
6. Fold in the chocolate chips.
7. Pour mixture into muffin cups, filling cups 3/4 full.
8. Bake for 20-25 minutes then cool on a wire rack.
I am not a huge banana fan, but apparently this week banana was just calling my name. At least I did not have 2 failed banana dishes. These were delicious and my kitchen smelled wonderful...until I made lasagna roll-ups and masked the banana scent.
Sunday, November 21, 2010
Pizza Bites
I was waiting for the perfect time to make these. They looked so fun and yummy over at Annie's Eats, but then again, everything she makes looks delicious. There's not much to say about these other than they are super easy and super delicious. They were gone in about 3 minutes once I set them on the table for the game today.

Pizza Bites
from: Annie's Eats
Ingredients:
½ batch pizza dough (enough for 1 pizza)
4 oz. mozzarella cheese, cubed (about 20-24 pieces)
Sliced pepperoni
For topping:
Olive oil
Italian seasoning
Grated Parmesan cheese
Directions:
Preheat the oven to 400˚ F. Lightly grease a 9-inch pie plate or cake pan. Divide the pizza dough into 20-24 roughly equal sized pieces. Take one of the dough pieces, top with a cube of cheese and a slice or two of pepperoni. Pull the edges of the dough around the fillings and pinch closed. Place seam-side down in the baking dish. Repeat with the remaining dough pieces.
Lightly brush the tops of the dough balls with olive oil. Sprinkle with Italian seasoning and grated Parmesan cheese. Bake for 20 minutes, or until the tops are golden brown.
I had marinara sauce to serve with them, but forgot it at home. They were great either way!
Chicken Enchilada Rollups
Game day. That really means finger food day to me. As much as I enjoy watching the Patriots, football isn't my sport. I'm more of a basketball and hockey girl. I saw this recipe over at Annie's Eats and wanted to try it. I have a similar recipe I've been using for a couple of years, so I wanted to compare. My recipe has no chicken and is a basic mix of cream cheese, sour cream, salsa and cheese. I think I kind of like mine better. Jaime and Tyler really liked these, so I was happy I made them. They are delicious, I think I just prefer the more basic one.
Chicken Enchilada Rollups
from: Annie's Eats
2 boneless, skinless chicken breasts
1 (8 oz.) pkg. cream cheese, softened
2/3 cup shredded cheese (cheddar, Mexican blend, pepper jack, etc.)
1 clove garlic, minced or pressed
2 tsp. chili powder
½ tsp. cumin
¼ tsp. cayenne pepper
Salt, to taste
Handful of cilantro, chopped
3 green onions, chopped
10 oz. can diced tomatoes with green chiles, drained well
4-6 8-inch tortillas
Directions:Season the chicken breasts with salt and pepper. Cook in a skillet over medium-high heat until lightly browned and cooked through. Transfer to a plate and let cool.
In the meantime, combine all of the remaining ingredients except tortillas in a large mixing bowl. Mix until well blended. Once the chicken is cool, transfer to a cutting board and chop or shred into small pieces. Add the chicken to the filling mixture and stir well to incorporate.
Spread a thin layer of the filling mixture over a tortilla, leaving a small border clear around the edge. Roll the tortilla up tightly into a spiral. Place the rolled up tortilla on a cutting board and use a sharp knife to cut into 1- to 1½-inch thick segments. Transfer to a serving platter and serve chilled or at room temperature.

Pumpkin Swirl Brownie Bites
Today is Sunday which means Patriots and baking! At the last minute, I decided I'd go to the Legion to watch the game, which meant bringing food. I had already planned on making these brownie bites today, so I added in a couple of finger foods which will be posted after.
The brownie bites came out nothing like I had hoped, though they were delicious. I am not going to post pictures because I will attempt this again and get it right. People raved about them at the bar though, which made me feel better. If you click on the source link you'll see what I was trying to make.
Pumpkin Swirl Brownie Bites
from: Bakers Royale
Prep: Heat oven to 350 degrees. Cover both mini muffins pans with bake spray.
Brownie Portion
I think next time I'm going to make them in a 9x9 pan and make them into squares. The bites are too small, and everyone ate several of them.
The brownie bites came out nothing like I had hoped, though they were delicious. I am not going to post pictures because I will attempt this again and get it right. People raved about them at the bar though, which made me feel better. If you click on the source link you'll see what I was trying to make.
Pumpkin Swirl Brownie Bites
from: Bakers Royale
Prep: Heat oven to 350 degrees. Cover both mini muffins pans with bake spray.
Brownie Portion
- 8 tablespoons unsalted butter
- 4oz. unsweetened chocolate
- 1 ¼ cups sugar
- 1 teaspoon vanilla extract
- ¼ salt
- 2 large eggs
- ½ cup all-purpose flour
- Place butter and chocolate in a double boiler or a bowl over simmering water. Stir frequently until mixture is melted.
- 2. Remove chocolate mixture from heat and stir in sugar, vanilla and salt. Add the eggs one at a time, stirring until each is incorporated before adding the next.
- 3. Stir in flour and beat with a wooden spoon until mixture is glossy about 1 minute.
- 8 oz cream cheese, softened
- 1/2 cup pumpkin puree
- 1 egg
- 1/2vanilla extract
- 1 tablespoon pumpkin pie spices
- 1/4 teaspoon salt
- 1/3 cup of sugar, plus two tablespoon
- 2 tablespoon flour
- Combine all ingredients and beat until blended.
- Fill mini muffin pans 2/3 of the way up with brownie mix. Reserve 1/3 cup of brownie and set aside. Next gently pour a spoonful of pumpkin mix on top. Place small dots of reserved brownie on top of pumpkin mix then using a skewer or a toothpick, lightly swirl brownie dot into pumpkin mix.
- Bake at 350 for about 10-12 minutes. Start checking for done-ness at 10 minutes by inserting a toothpick in the center. If it comes out clean the brownies are ready.
- Allow Pumpkin Swirl Brownie Bites to cool in pan for five minutes on a cooling rack before removing.
I think next time I'm going to make them in a 9x9 pan and make them into squares. The bites are too small, and everyone ate several of them.
Pizza with Caramelized Onions, Blue Cheese and Mushrooms
I really slacked on blogging this weekend. I have 5 (yes 5) recipes to post. I also slacked on photos, and the few I took aren't so great. Oh well.
I made dinner on Friday night. I haven't eaten at home on a Friday in maybe over a year. I had to go to the high school to watch WA Idol, and perform in the faculty act. We did a parody of the show 'Glee' and did a dance routine to "Good Vibrations" by Marky Mark and the Funky Bunch. It was pretty fun. I decided to make a pizza since it was quick, and it came out terrific! It just consisted of me caramelizing some onions and sauteing some shiitake mushrooms.


Pizza with Caramelized Onions and Blue Cheese
from: Bon Appetite: Fast Easy Fresh cookbook
2 1/2 tbsp olive oil, divided
2 large onions, thinly sliced
2 tsp light brown sugar
8 oz. fresh shiitake mushrooms, stemmed, caps sliced
1 14-oz. baked pizza crust
2 cups crumbled blue cheese
1 tbsp chopped fresh thyme
1. Heat 1 tablespoon of olive oil in a large nonstick skillet over medium heat. Add onions and saute until tender about 10 minutes. Sprinkle sugar over the onions. Reduce heat and saute onions until golden brown, about 20 minutes.
2. Heat remaining oil in a large skillet over high heat. Add mushrooms and sprinkle with salt and pepper. Saute mushrooms until tender and golden, about 8 minutes.
3. Preheat oven to 450. Place crust on a large baking sheet. Sprinkle blue cheese and thyme over crust. Top with onions, then mushrooms. Bake pizza until crust is crisp and topping is heated through, about 15 minutes.
I used regular white sugar when caramelizing my onions and added some balsamic vinegar in the last 5 minutes.

Wednesday, November 17, 2010
Chinese Stir-Fry Scallops
Let's chat for a moment. I came home from work today with no idea of what to make for dinner and being $10 away from a free turkey at Shaws. I rummaged through my new Bon Appetit Fast Easy Fresh cookbook (so awesome) and my bookmarked website recipes...and my recipe binders and books...and the last one I looked at was the winner. I almost made pizza, but decided to save that for Friday night. I wrote down my shopping list for tonight, Friday and my Sunday dessert and off I went to get my supplies (and my free turkey!).
Chinese Stir-Fry Scallops
from Use Real Butter
1 lb. fresh sea scallops
1 tbsps Chinese sherry
1 tsp cornstarch
4 tbsps Chinese black bean sauce
1 tbsp soy sauce
1 tsp sugar
2 tbsps water
2 tbsps vegetable oil
1 clove garlic, minced
4 or 5 slices of ginger
2 stalks green onion, fine chopped
Mix together the scallops, Chinese sherry, and cornstarch in a bowl until the scallops are evenly coated. Set aside. In a small bowl, combine the black bean sauce, soy sauce, sugar, and water. Set aside. Heat the vegetable oil in a large sauté pan over high flame. When the oil is hot, add the garlic and ginger. Stir-fry for a minute and add the scallops and scallions to the pan. Sauté for about a minute (those scallops cook fast and the saddest thing in the world is an overcooked rubbery scallop). Stir in the black bean sauce mixture. Stir stir stir for a minute. Remove from heat and serve immediately.


I used rice wine in place of the sherry, as I couldn't find (nor have any idea what is) Chinese sherry. I served mine over brown rice and added some steamed peas for a little something extra on the plate. Delish!
Before I go, I have to mention that I am wayyy excited that it is clementine season. There is a box sitting on mum's counter waiting to be devoured. I forget about clementines til I see them again in the fall...one of my favorite seasonal foods, along with mini cadbury eggs....
Tuesday, November 16, 2010
Oatmeal Cranberry White Chocolate Cookies
I finally got around to making cookies, which I am vigilantly watching on the cooling racks because my cat loves them. My goal for the rest of the night is to plan out my dinner for tomorrow and Sunday, and plan out my contributions to the Thanksgiving dinner. My family has been asking for the Butternut Squash Lasagna, so I'll probably do that, and I'm thinking Caramel Apple Cheesecake.
Oatmeal Cranberry White Chocolate Cookies
from an Ocean Spray ad in Everyday with Rachel Ray
Ingredients:
2/3 cup butter or margarine, softened
2/3 cup brown sugar (I used light)
2 large eggs
1 1/2 cups old-fashioned oats
1 1/2 cups flour
1 tsp. baking soda
1/2 tsp. salt
1 6-oz. package of dried cranberries (this recipe is from Ocean Spray, so they call for their brand)
2/3 cup white chocolate chips or chunks
Directions:
1. Preheat oven to 375.
2. Using an electric mixer, beat butter or margarine and brown sugar together in a medium bowl until light and fluffy. Add eggs, mixing well.

3. Combine oats, flour, baking soda and salt in a separate bowl. Add to butter mixture in several additions, mixing well after each addition. Stir in dried cranberries and white chocolate.

4. Drop by rounded teaspoonfuls onto an ungreased baking sheet. Bake for 10-12 minutes or until golden brown. Cool on wire rack.

Yield - 3 dozen cookies. (The recipe said 2.5 dozen, but I made 3 and used tablespoonfuls. It makes a lot.)
I haven't made cookies in such a long time, so I was pretty excited about these. They are simple and great for snacking.
In the time it has taken to me to fully update this post, they have cooled completely and I stored them in a ziploc bag....which had to be moved to on top of my fridge because my cat was trying to claw it open. He is currently destroying a white pillow by sprawling out on it and shedding his dark gray fur all over it. Oh pets....
Oatmeal Cranberry White Chocolate Cookies
from an Ocean Spray ad in Everyday with Rachel Ray
Ingredients:
2/3 cup butter or margarine, softened
2/3 cup brown sugar (I used light)
2 large eggs
1 1/2 cups old-fashioned oats
1 1/2 cups flour
1 tsp. baking soda
1/2 tsp. salt
1 6-oz. package of dried cranberries (this recipe is from Ocean Spray, so they call for their brand)
2/3 cup white chocolate chips or chunks
Directions:
1. Preheat oven to 375.
2. Using an electric mixer, beat butter or margarine and brown sugar together in a medium bowl until light and fluffy. Add eggs, mixing well.

3. Combine oats, flour, baking soda and salt in a separate bowl. Add to butter mixture in several additions, mixing well after each addition. Stir in dried cranberries and white chocolate.


4. Drop by rounded teaspoonfuls onto an ungreased baking sheet. Bake for 10-12 minutes or until golden brown. Cool on wire rack.

Yield - 3 dozen cookies. (The recipe said 2.5 dozen, but I made 3 and used tablespoonfuls. It makes a lot.)
I haven't made cookies in such a long time, so I was pretty excited about these. They are simple and great for snacking.
In the time it has taken to me to fully update this post, they have cooled completely and I stored them in a ziploc bag....which had to be moved to on top of my fridge because my cat was trying to claw it open. He is currently destroying a white pillow by sprawling out on it and shedding his dark gray fur all over it. Oh pets....
Monday, November 15, 2010
Roasted Red Pepper and Basil Pesto Pasta
Oh. My. Goodness. Gracious. Today was long, exhausting, and just full of anxiousness. I was looking forward to this dish, but not really looking forward to cooking it. I just want to melt into my couch and watch the cooking channel all night. But, I am so glad I made this and didn't just veg out and eat a sandwich or something, because this is amazingly delicious. I keep saying that I am going to eat healthier, but I just cannot forgo pasta. But this has roasted red pepper in it, which is a veggie, and veggies are healthy. Problem solved!
Back to reality and my unconditional love for all things carb. The recipe even calls for an optional addition for 1/4 cup of cream if you want a heavier, creamier sauce. I obviously added it, and even thought (just 1/4 cup??). I know. It's bad. But one day, my rich Italian boyfriend will love me for my love of cooking pasta dishes. Oh wait, this is reality right....?
I got this recipe from Annie's Eats, where I've gotten a lot of recipes lately. This girl is a doctor and amazing cook...and a mother.... and I thought my life was busy.

Roasted Red Pepper and Basil Pesto Pasta
Back to reality and my unconditional love for all things carb. The recipe even calls for an optional addition for 1/4 cup of cream if you want a heavier, creamier sauce. I obviously added it, and even thought (just 1/4 cup??). I know. It's bad. But one day, my rich Italian boyfriend will love me for my love of cooking pasta dishes. Oh wait, this is reality right....?
I got this recipe from Annie's Eats, where I've gotten a lot of recipes lately. This girl is a doctor and amazing cook...and a mother.... and I thought my life was busy.

 |
| The goodness |
Roasted Red Pepper and Basil Pesto Pasta
Ingredients:
3 cloves garlic
1/3 cup pine nuts
1/3 cup grated Parmesan cheese
1 cup roasted red bell pepper (fresh or jarred)
1 cup basil leaves
½ tsp. salt
¼ tsp. pepper
1/3 cup extra virgin olive oil
1 lb. penne pasta
¼ cup heavy cream, optional
Directions:
Place garlic and pine nuts in a food processor. Pulse until finely chopped. Add Parmesan, red pepper, basil leaves, salt and pepper. Pulse until well combined. With the motor running, add olive oil through the feed tube and process until incorporated. Set aside.
Cook pasta according to package directions. Drain and return to the pot. Add the pesto to the pasta and stir to combine. Stir in heavy cream if desired for a creamier sauce. Heat until warmed through. Serve immediately.
I wish my kitchen could smell like garlic and basil all the time....and balsamic vinegar....and freshly baked cookies....
A girl can dream!
If I find motivation, I will bake cookies tonight....but don't get your hopes up.
Saturday, November 13, 2010
Not So Good, But Oh So Good Foods
As I am sitting here, relaxing, looking up recipes on various blogs, I got sort of hungry. Earlier I had a cup of Trader Joe's Biryani, which just wasn't cutting it. I am supposed to get some real Indian food tonight, so the frozen Biryani wasn't feeding my need for Indian food. I rummaged around for a snack or small meal, and then went rummaging through Ma and Pa's fridge too. Then, I came across these in their freezer:

Yep. Stuffed Clams. Frozen stuffed clams to be exact. Everyone has those beloved foods that should really be avoided. I'm talking about the process, packaged, box, most-likely-so-unhealthy-but-totally-super-delicious foods. This is one of them. I haven't had them in YEARS, but ate them frequently as a child. I have never read a nutrition, or ingredient for that matter, label for these, and probably never will. There are plenty of other foods like this that I have enjoyed, and still enjoy, on a somewhat regular basis.
One of those being Ramen noodles. Seriously, don't tell me you've never eaten or don't like ramen noodles. They were a staple in college, and it is my firm belief that I was never hung over in college due to ramen noodles (and DP Dough, a place that delivered $4 calzones til 4 a.m.). Now that I have discovered real cooking, ramen is still in my life. There are some great recipes for soups and pasta that use ramen noodles.
Another food of this nature is Kraft Mac & Cheese. I probably eat this once a month...maybe a little less than that, and still love it. I often add peas and corn to my mac & cheese, or shrimp or lobster if I have it, and I like it cold. For years, I would never eat any food that should be served warm cold. The thought of cold pizza disgusted me (til I tried when I was, shall we say, a bit tipsy) and eating a cold pasta dish other than pasta salad was out of the question. To be honest, I don't remember the first time I ate cold mac & cheese, but it was glorious.
My tastes have changed over the years. When I was a child I ate almost nothing but fruits, veggies, pasta and seafood. Chicken occasionally, but beef, pork or steak...never. Other than hot dogs (which is a mix of mystery meat and god only knows what else), there was no meat in my life. Oh wait! I also LOVED fried bologna. Nowadays, I see a steak and my mouth waters, I will knock someone out to be first in line for a pulled pork sandwich and I even eat raw beef. Funny how children have such opinions of foods they have never tried. The only foods I still don't like to this day are raw tomatoes (though I will eat them if needed), plain mayo (mixed into dips and whatnot is fine), and mustard. Also, prime rib makes me gag. To see all that fat and people eating it is just not right.
I think I am done with this rant.
Thursday, November 11, 2010
Tex Mex Buttermilk Chicken Tenders
After the cheesecake adventure, I had planned an easy and quick dinner due to the fact that I was going to see the high school's performance of The Phantom of the Opera (which was incredible!). I decided to make Tex Mex chicken tenders that I saw in Rachel Ray's magazine.
Tex Mex Buttermilk Chicken Tenders
from Everyday with Rachel Ray
4 cups vegetable oil, for frying
2 tbsp. chili powder
1 tbsp. smoked paprika
1 tbsp. garlic powder
1 tbsp. onion powder
1 tbsp. poultry seasoning
2 tsp. grated lime peel
2 cups buttermilk
2 1/2 cups flour
2 lbs. chicken tenders
1. In a large heavy skillet, heat the oil over medium-high heat. In a bowl, combine the chili powder, paprika, garlic powder, onion powder, poultry seasoning and lime peel. In a shallow bowl, combine the buttermilk with half of the spice mix. In another shallow bowl, combine the flour and remaining spice mix. Season the chicken tenders with salt and pepper.
2. Using tongs, dip the tenders into the buttermilk, then coat with the flour mix; repeat for a second coating. Working in batches, add the chicken tenders to the skillet and cook until golden, 6 to 8 minutes. Drain on a rack.
I served them with some sliced up russet potatoes that were baked with some monterey jack cheese and green onions. You just slice some potatoes, toss them with olive oil, salt and pepper, brown them in a skillet for 8 to 10 minutes, then either transfer the skillet to the oven (if it oven proof) and bake at 375 for about 25 minutes. Or, transfer them to ramekins as I did.
I would add more chili powder to the mix next time, as I was hoping the tenders would have a kick to them, and they didn't. The texture was great, nice and thick, and the chicken was cooked perfectly. It was very juicy.
For now, I am signing off and checking the newest additions to my favorite websites Tastespotting and Foodgawker (why won't it let me add in a link???).
Tex Mex Buttermilk Chicken Tenders
from Everyday with Rachel Ray
4 cups vegetable oil, for frying
2 tbsp. chili powder
1 tbsp. smoked paprika
1 tbsp. garlic powder
1 tbsp. onion powder
1 tbsp. poultry seasoning
2 tsp. grated lime peel
2 cups buttermilk
2 1/2 cups flour
2 lbs. chicken tenders
1. In a large heavy skillet, heat the oil over medium-high heat. In a bowl, combine the chili powder, paprika, garlic powder, onion powder, poultry seasoning and lime peel. In a shallow bowl, combine the buttermilk with half of the spice mix. In another shallow bowl, combine the flour and remaining spice mix. Season the chicken tenders with salt and pepper.
2. Using tongs, dip the tenders into the buttermilk, then coat with the flour mix; repeat for a second coating. Working in batches, add the chicken tenders to the skillet and cook until golden, 6 to 8 minutes. Drain on a rack.
I served them with some sliced up russet potatoes that were baked with some monterey jack cheese and green onions. You just slice some potatoes, toss them with olive oil, salt and pepper, brown them in a skillet for 8 to 10 minutes, then either transfer the skillet to the oven (if it oven proof) and bake at 375 for about 25 minutes. Or, transfer them to ramekins as I did.
 | ||
| The Lineup |
 |
| Mix them all together with some lime |
 |
| It will look like this... |
 |
| No pictures of the coating, but definitely some frying |
 |
| Very simple dinner |
I would add more chili powder to the mix next time, as I was hoping the tenders would have a kick to them, and they didn't. The texture was great, nice and thick, and the chicken was cooked perfectly. It was very juicy.
For now, I am signing off and checking the newest additions to my favorite websites Tastespotting and Foodgawker (why won't it let me add in a link???).
Subscribe to:
Posts (Atom)